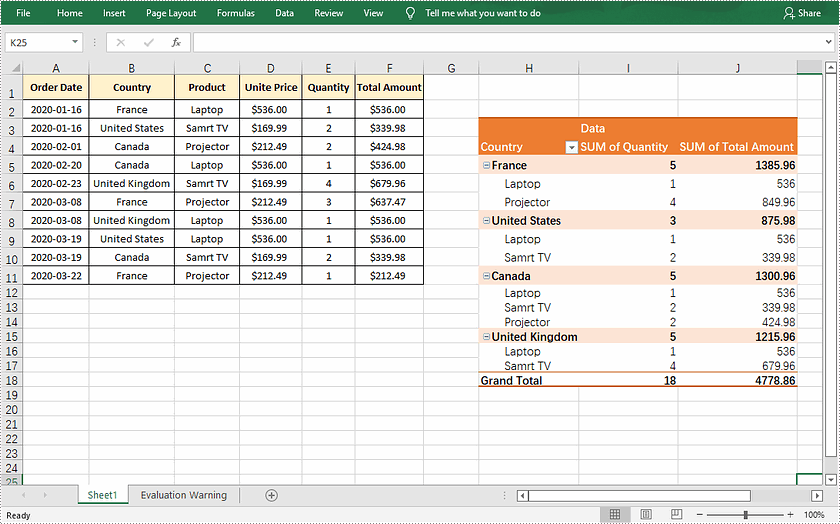
Pivot table is a kind of interactive table that is capable of quickly calculating, summarizing and analyzing large amounts of data. As one of the most powerful tools in Excel, it enables users to view static data from different perspectives, and also makes the comparisons between data more intuitive. In this article, you will learn how to programmatically create a pivot table in Excel using Spire.XLS for .NET.
Install Spire.XLS for .NET
To begin with, you need to add the DLL files included in the Spire.XLS for .NET package as references in your .NET project. The DLL files can be either downloaded from this link or installed via NuGet.
PM> Install-Package Spire.XLS
Create a Pivot Table in Excel
The detailed steps are as follows.
- Create a Workbook object.
- Load a sample Excel document using Workbook.LoadFromFile() method.
- Get a specified worksheet using Workbook.Worksheets[] property.
- Select the data source range using Worksheet.Range[] property, and then create a PivotCache to save the data information using Workbook.PivotCaches.Add (CellRange) method.
- Add a pivot table to the specified worksheet and set the location and cache of it using Worksheet.PivotTables.Add(String, CellRange, PivotCache) method.
- Define row labels of the pivot table and then add fields to the data area to calculate data using PivotTable.DataFields.Add(IPivotField, String, SubtotalTypes) method.
- Set the pivot table style using PivotTable.BuiltInStyle property.
- Save the result document using Workbook.SaveToFile() method.
- C#
- VB.NET
using Spire.Xls;

namespace createPivotTable
{
    class Program
    {
        static void Main(string[] args)
        {
            //Create a Workbook object
            Workbook workbook = new Workbook();

            //Load a sample Excel document
            workbook.LoadFromFile(@"E:\Files\sample.xlsx");

            //Get the first worksheet
            Worksheet sheet = workbook.Worksheets[0];

            //Select the data source range
            CellRange dataRange = sheet.Range["B1:F11"];
            PivotCache cache = workbook.PivotCaches.Add(dataRange);

            //Add a PivotTable to the worksheet and set the location and cache of it
            PivotTable pt = sheet.PivotTables.Add("Pivot Table", sheet.Range["H3"], cache);

            //Define row labels
            PivotField r1 = pt.PivotFields["Country"] as PivotField;
            r1.Axis = AxisTypes.Row;
            pt.Options.RowHeaderCaption = "Country";

            PivotField r2 = pt.PivotFields["Product"] as PivotField;
            r2.Axis = AxisTypes.Row;

            //Add data fields to calculate data
            pt.DataFields.Add(pt.PivotFields["Quantity"], "SUM of Quantity", SubtotalTypes.Sum);
            pt.DataFields.Add(pt.PivotFields["Total Amount"], "SUM of Total Amount", SubtotalTypes.Sum);

            //Set pivot table style
            pt.BuiltInStyle = PivotBuiltInStyles.PivotStyleMedium10;

            //Save the document
            workbook.SaveToFile("CreatePivotTable.xlsx", ExcelVersion.Version2010);

        }
    }
}

Apply for a Temporary License
If you'd like to remove the evaluation message from the generated documents, or to get rid of the function limitations, please request a 30-day trial license for yourself.


