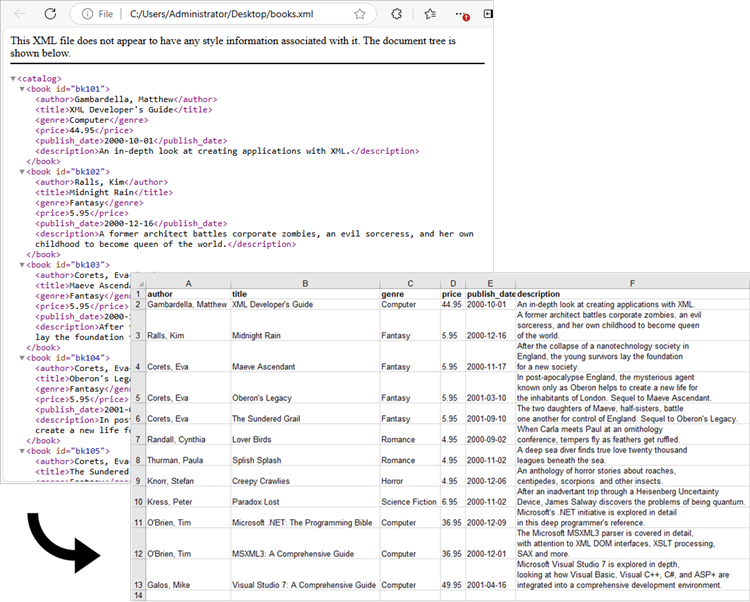
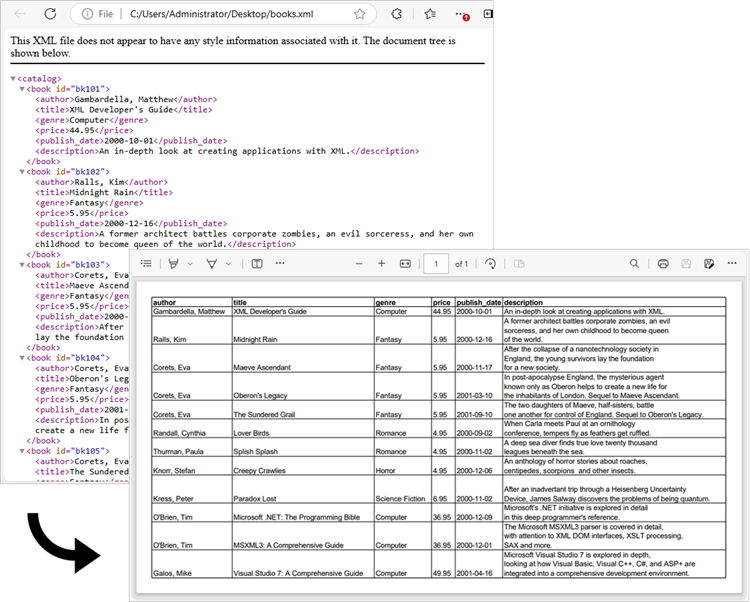
XML is widely used for storing and exchanging data due to its flexibility and self-descriptive nature. However, many users find it challenging to work with XML files directly. Excel, on the other hand, is a familiar and user-friendly tool for data analysis. Converting XML to Excel not only makes data more accessible but also enhances its usability for various applications.
In this article, you will learn how to convert XML to Excel as well as XML to PDF in Python using Spire.XLS for Python.
Install Spire.XLS for Python
This scenario requires Spire.XLS for Python and plum-dispatch v1.7.4. They can be easily installed in your Windows through the following pip command.
pip install Spire.XLS
If you are unsure how to install, please refer to this tutorial: How to Install Spire.XLS for Python on Windows
Understanding XML Structure: Elements, Attributes, and Data
Before converting XML to Excel, it's crucial to understand the structure of XML files. XML is a markup language that uses tags to define elements, attributes, and data. Here’s a breakdown of these components:
- Elements: These are the building blocks of XML. They are defined by start and end tags and can contain data or other elements.
<person>
    <name>John Doe</name>
    <age>30</age>
</person>
- Attributes: These provide additional information about elements. They are specified within the start tag of an element.
<person id="1">
    <name>John Doe</name>
    <age>30</age>
</person>
- Data: This is the content enclosed within the start and end tags of an element.
Understanding these components will help you map XML data to Excel effectively.
Convert XML to Excel in Python
To load an XML file into Python, you can use the xml.etree.ElementTree library, which is included in Python's standard library. This library provides methods to navigate and manipulate the XML tree. Here is an example:
import xml.etree.ElementTree as ET

# Load the XML file
tree = ET.parse('data.xml')
root = tree.getroot()

# Iterate through elements
for person in root.findall('person'):
    name = person.find('name').text
    age = person.find('age').text
After parsing the XML data, the next step is to map it to an Excel worksheet. You can utilize Spire.XLS for Python to create a new workbook, input data into specific cells, and apply styles and formatting to the worksheet. These formatting options include auto-fitting column widths, adjusting text alignment and making the header bold.
To convert XML to Excel in Python, follow these steps:
- Use the xml.etree.ElementTree library to retrieve data from an XML file.
- Create a Workbook object.
- Add a worksheet using the Workbook.Worksheets.Add() method.
- Write data extracted from the XML file into the cells of the worksheet using the Worksheet.SetValue() method.
- Apply styles and formatting to enhance the worksheet appearance.
- Save the workbook to an Excel file.
The following code provides a more intelligent and advanced way to read data from XML and import it into an Excel file.
- Python
from spire.xls import *
from spire.xls.common import *
import xml.etree.ElementTree as ET

# Create a Workbook object
workbook = Workbook()

# Remove default worksheets
workbook.Worksheets.Clear()

# Add a worksheet and name it
worksheet = workbook.Worksheets.Add("Books")

# Load an XML file
xml_tree = ET.parse("C:\\Users\\Administrator\\Desktop\\Books.xml")

# Get the root element of the XML tree
xml_root = xml_tree.getroot()

# Get the first the "book" element
first_book = xml_root.find("book")

# Extract header information and convert it into a list
header = list(first_book.iter())[1:]

# Write header to Excel
for col_index, header_node in enumerate(header, start=1):
    header_text = header_node.tag
    worksheet.SetValue(1, col_index, header_text)

# Write other data to Excel by iterating over each book element and each data node within it
row_index = 2
for book in xml_root.iter("book"):
    for col_index, data_node in enumerate(list(book.iter())[1:], start=1):
        value = data_node.text
        header_text = list(header[col_index - 1].iter())[0].tag
        worksheet.SetValue(row_index, col_index, value)
    row_index += 1

# Set column width
worksheet.AllocatedRange.AutoFitColumns()

# Set alignment
worksheet.AllocatedRange.HorizontalAlignment = HorizontalAlignType.Left

# Set font style
worksheet.Range["A1:F1"].Style.Font.IsBold = True

# Save the workbook to an Excel file
workbook.SaveToFile("output/XmlToExcel.xlsx")

# Dispose resources
workbook.Dispose()

Convert XML to PDF in Python
The previous example successfully imports data from an XML file into an Excel worksheet. You can convert this worksheet to a PDF using the Worksheet.SaveToPdf() method. To create a well-structured PDF, consider adjusting page layout settings, such as margins and gridline preservation, during the conversion process.
The steps to convert XML to PDF using Python are as follows:
- Use the xml.etree.ElementTree library to retrieve data from an XML file.
- Create a Workbook object.
- Add a worksheet using the Workbook.Worksheets.Add() method.
- Write data extracted from the XML file into the cells of the worksheet using the Worksheet.SetValue() method.
- Apply styles and formatting to enhance the worksheet appearance.
- Configure page settings using the properties under the PageSetup object, which is returned by the Worksheet.PageSetup property.
- Save the worksheet as a PDF file using the Worksheet.SaveToPdf() method.
The following code snippet demonstrates how to import data from XML into a worksheet and save that worksheet as a PDF file.
- Python
from spire.xls import *
from spire.xls.common import *
import xml.etree.ElementTree as ET

# Create a Workbook object
workbook = Workbook()

# Remove default worksheets
workbook.Worksheets.Clear()

# Add a worksheet and name it
worksheet = workbook.Worksheets.Add("Books")

# Load an XML file
xml_tree = ET.parse("C:\\Users\\Administrator\\Desktop\\Books.xml")

# Get the root element of the XML tree
xml_root = xml_tree.getroot()

# Get the first the "book" element
first_book = xml_root.find("book")

# Extract header information and convert it into a list
header = list(first_book.iter())[1:]

# Write header to Excel
for col_index, header_node in enumerate(header, start=1):
    header_text = header_node.tag
    worksheet.SetValue(1, col_index, header_text)

# Write other data to Excel by iterating over each book element and each data node within it
row_index = 2
for book in xml_root.iter("book"):
    for col_index, data_node in enumerate(list(book.iter())[1:], start=1):
        value = data_node.text
        header_text = list(header[col_index - 1].iter())[0].tag
        worksheet.SetValue(row_index, col_index, value)
    row_index += 1

# Set column width
worksheet.AllocatedRange.AutoFitColumns()

# Set alignment
worksheet.AllocatedRange.HorizontalAlignment = HorizontalAlignType.Left

# Set font style
worksheet.Range["A1:F1"].Style.Font.IsBold = True

# Fit worksheet on one page
workbook.ConverterSetting.SheetFitToPage = True

# Get the PageSetup object
pageSetup = worksheet.PageSetup

# Set page margins
pageSetup.TopMargin = 0.3
pageSetup.BottomMargin = 0.3
pageSetup.LeftMargin = 0.3
pageSetup.RightMargin = 0.3

# Preserve gridlines
pageSetup.IsPrintGridlines = True

# Save the worksheet to a PDF file
worksheet.SaveToPdf("output/XmlToPdf.pdf")

# Dispose resources
workbook.Dispose()

Apply for a Temporary License
If you'd like to remove the evaluation message from the generated documents, or to get rid of the function limitations, please request a 30-day trial license for yourself.


