Python: Add or Remove Sections in PowerPoint
In PowerPoint, sections are a powerful tool for organizing and managing slides. By dividing slides into different sections, you can better organize content, navigate through your presentation, and present information in a more structured manner. This article will demonstrate how to add and remove sections in a PowerPoint presentation using Spire.Presentation for Python.
- Add a Section at the End of a PowerPoint
- Insert a Section Before a Specified Section
- Add a Section Before a Specified Slide in PowerPoint
- Remove a Section from a PowerPoint
Install Spire.PDF for Python
This scenario requires Spire.Presentation for Python and plum-dispatch v1.7.4. They can be easily installed in your Windows through the following pip command.
pip install Spire.Presentation
If you are unsure how to install, please refer to this tutorial: How to Install Spire.Presentation for Python on Windows
Add a Section at the End of a PowerPoint in Python
Spire.Presentation for Python provides the Presentation.SectionList.Append(section_name) method to add a section at the end of a presentation. Here are the specific steps to perform this operation:
- Create a Presentation class instance.
- Load a PowerPoint document using Presentation.LoadFromFile() method.
- Add a section at the end using the Presentation.SectionList.Append() method.
- Save the document using Presentation.SaveToFile() method.
- Python
from spire.presentation.common import *
from spire.presentation import *

# Create a new presentation object
presentation = Presentation()

# Load a sample PowerPoint presentation
presentation.LoadFromFile("sample.pptx")

# Append a new section
presentation.SectionList.Append("New Section")

# Save the presentation
presentation.SaveToFile("AddSection.pptx", FileFormat.Pptx2013)

# Dispose of the presentation object
presentation.Dispose()

Insert a Section Before a Specified Section in Python
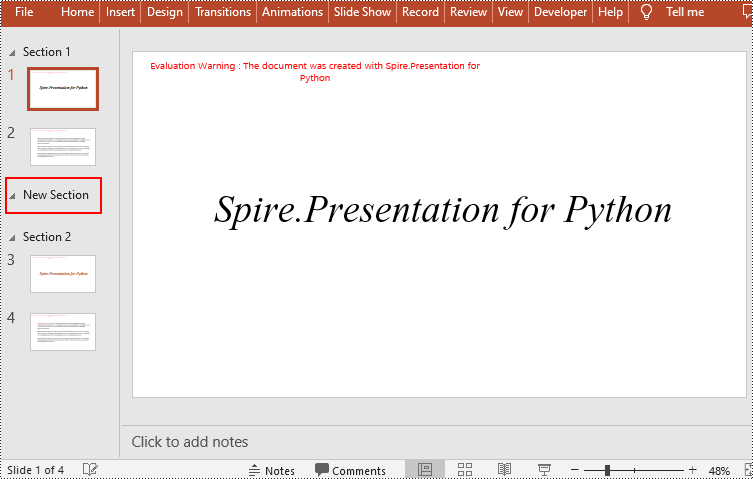
You can also use the Presentation.SectionList.Insert(index, section_name) method to insert a new section before a specific section. Here are the detailed steps:
- Create a Presentation class instance.
- Load a PowerPoint document using Presentation.LoadFromFile() method.
- Insert a new section before a specific section using the Presentation.SectionList.Insert() method, where index is the position of the specific section.
- Save the document using Presentation.SaveToFile() method.
- Python
from spire.presentation.common import *
from spire.presentation import *

# Create a new presentation object
presentation = Presentation()

# Load a sample PowerPoint presentation
presentation.LoadFromFile("sample.pptx")

# Insert a new section before the second section
presentation.SectionList.Insert(1," New Section")

# Save the presentation
presentation.SaveToFile("AddSection.pptx", FileFormat.Pptx2013)

# Dispose of the presentation object
presentation.Dispose()
Add a Section Before a Specified Slide in Python
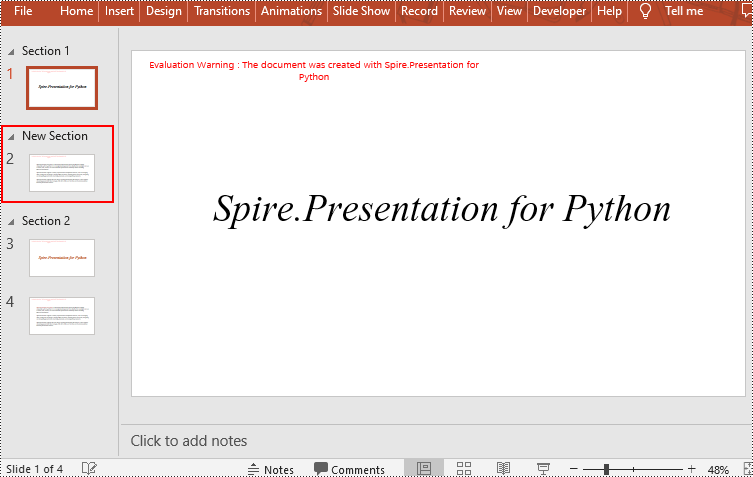
You can also use the Presentation.SectionList.Add(section_name, slide) method to insert a new section before a specific slide. Here are the detailed steps:
- Create a Presentation class instance.
- Load a PowerPoint document using Presentation.LoadFromFile() method.
- Insert a new section before a specific slide using the Presentation.SectionList.Add() method
- Save the document using Presentation.SaveToFile() method.
- Python
from spire.presentation.common import *
from spire.presentation import *

# Create a new presentation object
presentation = Presentation()

# Load a sample PowerPoint presentation
presentation.LoadFromFile("sample.pptx")

# Get the second slide
slide=presentation.Slides[1]

# Add a new section before the second slide
presentation.SectionList.Add("New Section",slide)

# Save the presentation
presentation.SaveToFile("AddSection.pptx", FileFormat.Pptx2013)

# Dispose of the presentation object
presentation.Dispose()
Remove a Section from a PowerPoint in Python
If you don't need a specific section, you can simply remove it using the Presentation.SectionList.RemoveAt(index_to_remove) method. Please note that removing a section does not delete the slides within that section. Here are the steps to delete a specific section while preserving its slides:
- Create a Presentation class instance.
- Load a PowerPoint document using Presentation.LoadFromFile() method.
- Remove a specific section using the Presentation.SectionList.RemoveAt(index_to_remove) method, which takes an integer index as a parameter. You can also remove all sections using the Presentation.Slides.RemoveAll() method.
- Save the document using Presentation.SaveToFile() method.
- Python
from spire.presentation.common import *
from spire.presentation import *

# Create a new presentation object
presentation = Presentation()

# Load a sample PowerPoint presentation
presentation.LoadFromFile("sample.pptx")

# Remove the second section
presentation.SectionList.RemoveAt(1);

# # Remove all sections
# presentation.SectionList.RemoveAll();

# Save the presentation
presentation.SaveToFile("RemoveSection.pptx", FileFormat.Pptx2013)

# Dispose of the presentation object
presentation.Dispose()

Apply for a Temporary License
If you'd like to remove the evaluation message from the generated documents, or to get rid of the function limitations, please request a 30-day trial license for yourself.
Python: Add Text or Image Watermarks to PowerPoint
Watermarks serve as subtle overlays placed on the slides, typically in the form of text or images, which can convey messages, copyright information, company logos, or other visual elements. By incorporating watermarks into your PowerPoint presentations, you can enhance professionalism, reinforce branding, and discourage unauthorized use or distribution of your material. In this article, you will learn how to add text or image watermarks to a PowerPoint document in Python using Spire.Presentation for Python.
Install Spire.Presentation for Python
This scenario requires Spire.Presentation for Python and plum-dispatch v1.7.4. They can be easily installed in your Windows through the following pip command.
pip install Spire.Presentation
If you are unsure how to install, please refer to this tutorial: How to Install Spire.Presentation for Python on Windows
Add a Text Watermark to PowerPoint in Python
Unlike MS Word, PowerPoint does not have a built-in feature that allows to apply watermarks to each slide. However, you can add a shape with text or an image to mimic the watermark effect. A shape can be added to a slide using the ISlide.Shapes.AppendShape() method, and the text of the shape can be set through the IAutoShape.TextFrame.Text property. To prevent the shape from overlapping the existing content on the slide, you'd better send it to the bottom.
The following are the steps to add a text watermark to a slide using Spire.Presentation for Python.
- Create a Presentation object.
- Load a PowerPoint file using Presentation.LoadFromFile() method.
- Get a specific slide through Prentation.Slides[index] property.
- Add a shape to the slide using ISlide.Shapes.AppendShape() method.
- Add text to the shape through IAutoShape.TextFrame.Text property.
- Send the shape to back using IAutoShape.SetShapeArrange() method.
- Save the presentation to a PowerPoint file using Presentation.SaveToFile() method.
- Python
from spire.presentation.common import *
from spire.presentation import *

# Create a Presentation object
presentation = Presentation()

# Load a PowerPoint file
presentation.LoadFromFile("C:/Users/Administrator/Desktop/input.pptx")

# Define a rectangle
left = (presentation.SlideSize.Size.Width - 350.0) / 2
top = (presentation.SlideSize.Size.Height - 110.0) / 2
rect = RectangleF(left, top, 350.0, 110.0)

for i in range(0, presentation.Slides.Count):

    # Add a rectangle shape to
    shape = presentation.Slides[i].Shapes.AppendShape(
    ShapeType.Rectangle, rect)

    # Set the style of the shape
    shape.Fill.FillType = FillFormatType.none
    shape.ShapeStyle.LineColor.Color = Color.get_Transparent()
    shape.Rotation = -35
    shape.Locking.SelectionProtection = True
    shape.Line.FillType = FillFormatType.none

    # Add text to the shape
    shape.TextFrame.Text = "CONFIDENTIAL"
    textRange = shape.TextFrame.TextRange

    # Set the style of the text range
    textRange.Fill.FillType = FillFormatType.Solid
    textRange.Fill.SolidColor.Color = Color.FromArgb(120, Color.get_Black().R, Color.get_HotPink().G, Color.get_HotPink().B)
    textRange.FontHeight = 45
    textRange.LatinFont = TextFont("Times New Roman")

    # Send the shape to back
    shape.SetShapeArrange(ShapeArrange.SendToBack)

# Save to file
presentation.SaveToFile("output/TextWatermark.pptx", FileFormat.Pptx2010)
presentation.Dispose()

Add an Image Watermark to PowerPoint in Python
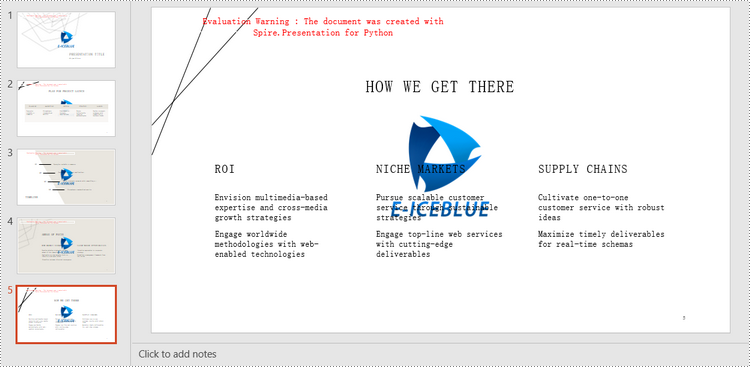
To add an image watermark, you need first to create a rectangle with the same size as an image. Then fill the shape with this image and place the shape at the center of a slide. To prevent the shape from overlapping the existing content on the slide, you need to send it to the bottom as well. The following are the steps to add an image watermark to a slide using Spire.Presentation for Python.
- Create a Presentation object.
- Load a PowerPoint file using Presentation.LoadFromFile() method.
- Get a specific slide through Prentation.Slides[index] property.
- Load an image using Presentation.Images.AppendStream() method.
- Add a shape that has the same size with the image to the slide using ISlide.Shapes.AppendShape() method.
- Fill the shape with the image through IAuotShape.Fill.PictureFill.Picture.EmbedImage property.
- Send the shape to back using IAutoShape.SetShapeArrange() method.
- Save the presentation to a PowerPoint file using Presentation.SaveToFile() method.
- Python
from spire.presentation.common import *
from spire.presentation import *

# Create a Presentation object
presentation = Presentation()

# Load a PowerPoint file
presentation.LoadFromFile("C:/Users/Administrator/Desktop/input.pptx")

# Load an image
stream = Stream("C:/Users/Administrator/Desktop/logo.png")
image = presentation.Images.AppendStream(stream)
stream.Close()

# Get width and height of the image
width = (float)(image.Width)
height = (float)(image.Height)

#
slideSize = presentation.SlideSize.Size

# Loop through the slides in the presentation
for i in range(0, presentation.Slides.Count):

    # Get a specific slide
    slide = presentation.Slides[i]

    # Add a shape to slide
    shape = slide.Shapes.AppendShape(ShapeType.Rectangle, RectangleF((slideSize.Width - width )/2, (slideSize.Height - height)/2, width, height))

    # Fill the shape with image
    shape.Line.FillType = FillFormatType.none
    shape.Locking.SelectionProtection = True
    shape.Fill.FillType =  FillFormatType.Picture
    shape.Fill.PictureFill.FillType = PictureFillType.Stretch
    shape.Fill.PictureFill.Picture.EmbedImage = image

    # Send the shape to back
    shape.SetShapeArrange(ShapeArrange.SendToBack)

# Save to file
presentation.SaveToFile("output/ImageWatermark.pptx", FileFormat.Pptx2013)
presentation.Dispose()
Apply for a Temporary License
If you'd like to remove the evaluation message from the generated documents, or to get rid of the function limitations, please request a 30-day trial license for yourself.
Python: Protect or Unprotect PowerPoint Presentations
PowerPoint presentations often contain sensitive information, such as financial data, trade secrets, or personal details. When sharing these files via email or cloud storage, it is important to prevent unauthorized individuals from accessing or viewing them. To protect the content of your PowerPoint presentation, there are various security measures you can employ. For instance, you can implement password protection, or make the presentation as final or read-only. In certain situations, you may find the need to unprotect a password-protected or encrypted PowerPoint presentation. This may be necessary when you need to share the file with the public or when the password is no longer needed. In this article, we will explain how to protect or unprotect a PowerPoint presentation in Python using Spire.Presentation for Python.
- Protect a PowerPoint Presentation with a Password
- Mark a PowerPoint Presentation as Final
- Make a PowerPoint Presentation Read-Only
- Remove Password Protection from a PowerPoint Presentation
- Remove Mark as Final Option from a PowerPoint Presentation
- Remove Read-Only Option from a PowerPoint Presentation
Install Spire.Presentation for Python
This scenario requires Spire.Presentation for Python and plum-dispatch v1.7.4. They can be easily installed in your Windows through the following pip command.
pip install Spire.Presentation
If you are unsure how to install, please refer to this tutorial: How to Install Spire.Presentation for Python on Windows
Protect a PowerPoint Presentation with a Password
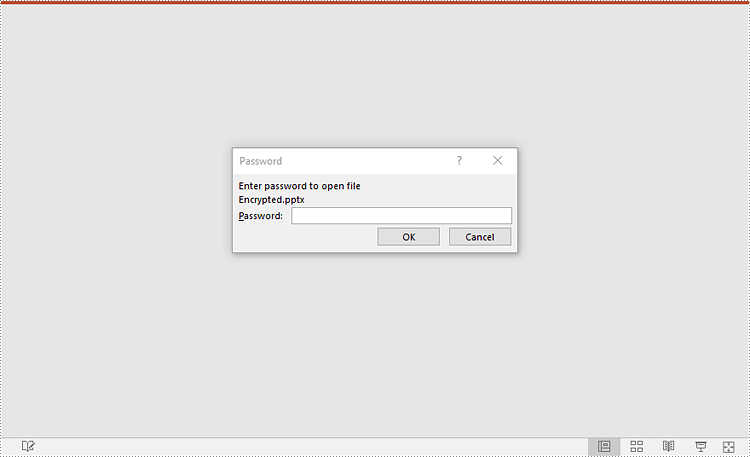
You can protect a PowerPoint presentation with a password to ensure that only the people who have the right password can view and edit it.
The following steps demonstrate how to protect a PowerPoint presentation with a password:
- Create an object of the Presentation class.
- Load a PowerPoint presentation using Presentation.LoadFromFile() method.
- Encrypt the presentation with a password using Presentation.Encrypt() method.
- Save the resulting presentation using Presentation.SaveToFile() method.
- Python
from spire.presentation import *

# Create a Presentation object
presentation = Presentation()
# Load a PowerPoint presentation
presentation.LoadFromFile("Sample.pptx")

# Encrypy the presentation with a password
presentation.Encrypt("your password")

# Save the resulting presentation
presentation.SaveToFile("Encrypted.pptx", FileFormat.Pptx2016)
presentation.Dispose()
Mark a PowerPoint Presentation as Final
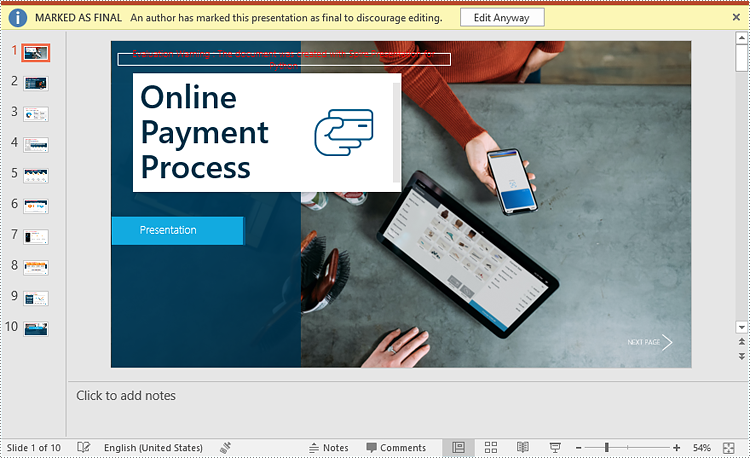
You can mark a PowerPoint presentation as final to inform readers that the document is final and no further editing is expected.
The following steps demonstrate how to mark a PowerPoint presentation as final:
- Create an object of the Presentation class.
- Load a PowerPoint presentation using Presentation.LoadFromFile() method.
- Mark the presentation as final using presentation.DocumentProperty.MarkAsFinal property.
- Save the resulting presentation using Presentation.SaveToFile() method.
- Python
from spire.presentation import *

# Create a Presentation object
presentation = Presentation()
# Load a PowerPoint presentation
presentation.LoadFromFile("Sample.pptx")

# Mark the presentation as final
presentation.DocumentProperty.MarkAsFinal = True

# Save the resulting presentation
presentation.SaveToFile("MarkAsFinal.pptx", FileFormat.Pptx2016)
presentation.Dispose()
Make a PowerPoint Presentation Read-Only
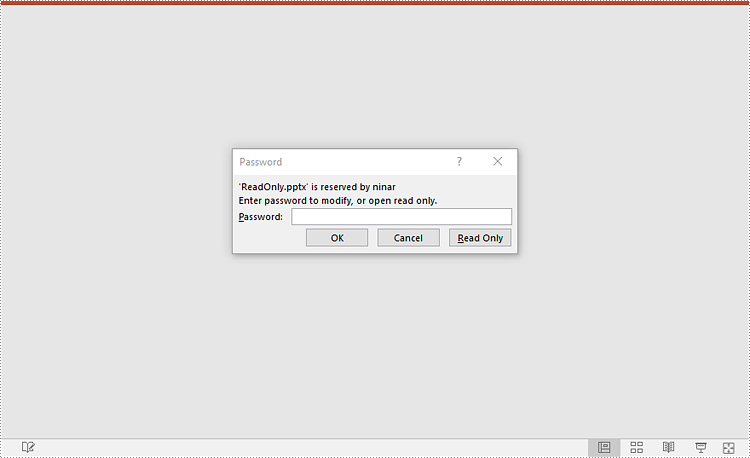
You can make a PowerPoint presentation read-only to allow others to view it while preventing them from making any changes to the content.
The following steps demonstrate how to make a PowerPoint presentation read-only:
- Create an object of the Presentation class.
- Load a PowerPoint presentation using Presentation.LoadFromFile() method.
- Make the presentation read-only using Presentation.Protect() method.
- Save the resulting presentation using Presentation.SaveToFile() method.
- Python
from spire.presentation import *

# Create a Presentation object
presentation = Presentation()
# Load a PowerPoint presentation
presentation.LoadFromFile("Sample.pptx")

# Make the presentation read-only by protecting it with a password
presentation.Protect("your password")

# Save the resulting presentation
presentation.SaveToFile("ReadOnly.pptx", FileFormat.Pptx2016)
presentation.Dispose()
Remove Password Protection from a PowerPoint Presentation
You can remove password protection from a PowerPoint presentation by loading the presentation with the correct password and then removing the password protection from it.
The following steps demonstrate how to remove password protection from a PowerPoint presentation:
- Create an object of the Presentation class.
- Load a password-protected PowerPoint presentation with its password using Presentation.LoadFromFile() method.
- Remove password protection from the presentation using Presentation.RemoveEncryption() method.
- Save the resulting presentation using Presentation.SaveToFile() method.
- Python
from spire.presentation import *

# Create a Presentation object
presentation = Presentation()
# Load an encrypted PowerPoint presentation with its password
presentation.LoadFromFile("Encrypted.pptx", "your password")

# Remove password encryption from the presentation
presentation.RemoveEncryption()

# Save the resulting presentation
presentation.SaveToFile("Decrypted.pptx", FileFormat.Pptx2016)
presentation.Dispose()

Remove Mark as Final Option from a PowerPoint Presentation
The mark as final feature makes a PowerPoint presentation read-only to prevent further changes, if you decide to make changes to the presentation later, you can remove the mark as final option from it.
The following steps demonstrate how to remove the mark as final option from a PowerPoint presentation:
- Create an object of the Presentation class.
- Load a PowerPoint presentation that has been marked as final using Presentation.LoadFromFile() method.
- Remove the mark as final option from the presentation using presentation.DocumentProperty.MarkAsFinal property.
- Save the resulting presentation using Presentation.SaveToFile() method.
- Python
from spire.presentation import *

# Create a Presentation object
presentation = Presentation()
# Load a PowerPoint presentation that has been marked as final
presentation.LoadFromFile("MarkAsFinal.pptx")

# Remove the mark as final option from the presentation
presentation.DocumentProperty.MarkAsFinal = False

# Save the resulting presentation
presentation.SaveToFile("RemoveMarkAsFinal.pptx", FileFormat.Pptx2016)
presentation.Dispose()

Remove Read-Only Option from a PowerPoint Presentation
Removing the read-only option from a PowerPoint presentation allows you to regain full editing capabilities, enabling you to modify, add, or delete content within the presentation as needed.
The following steps demonstrate how to remove the read-only option from a PowerPoint presentation:
- Create an object of the Presentation class.
- Load a PowerPoint presentation that has been made as read-only using Presentation.LoadFromFile() method.
- Remove the read-only option from the presentation using Presentation.RemoveProtect() method.
- Save the resulting presentation using Presentation.SaveToFile() method.
- Python
from spire.presentation import *

# Create a Presentation object
presentation = Presentation()
# Load a PowerPoint presentation that has been made as read-only
presentation.LoadFromFile("ReadOnly.pptx")

# Remove the read-only option from the presentation
presentation.RemoveProtect()

# Save the resulting presentation
presentation.SaveToFile("RemoveReadOnly.pptx", FileFormat.Pptx2016)
presentation.Dispose()

Apply for a Temporary License
If you'd like to remove the evaluation message from the generated documents, or to get rid of the function limitations, please request a 30-day trial license for yourself.
Python: Add, Read or Delete Speaker Notes in PowerPoint
Speaker notes in PowerPoint play a crucial role in enhancing the presenter's delivery and ensuring a seamless presentation experience. They can be added to individual slides to provide valuable guidance, reminders, and supplementary information for the presenter. Unlike the content displayed on the slides, speaker notes are typically not visible to the audience during the actual presentation. In this article, we'll explain how to add, read or delete speaker notes in a PowerPoint presentation in Python using Spire.Presentation for Python.
- Add Speaker Notes to PowerPoint in Python
- Read Speaker Notes in PowerPoint in Python
- Delete Speaker Notes from PowerPoint in Python
Install Spire.Presentation for Python
This scenario requires Spire.Presentation for Python and plum-dispatch v1.7.4. They can be easily installed in your Windows through the following pip command.
pip install Spire.Presentation
If you are unsure how to install, please refer to this tutorial: How to Install Spire.Presentation for Python on Windows
Add Speaker Notes to PowerPoint in Python
Spire.Presentation for Python provides the ISlide.AddNotesSlides() method to add notes to a PowerPoint slide. The detailed steps are as follows.
- Create a Presentation object.
- Load a PowerPoint presentation using Presentation.LoadFromFile() method.
- Get the slide that you want to add notes to using Presentation.Slides[index] property.
- Add a notes slide to the slide using ISlide.AddNotesSlides() method.
- Create TextParagraph objects and set text for the paragraphs using TextParagraph.Text property, then add the paragraphs to the notes slide using NotesSlide.NotesTextFrame.Paragraphs.Append() method.
- Save the resulting presentation using Presentation.SaveToFile() method.
- Python
from spire.presentation.common import *
from spire.presentation import *

# Create a Presentation object
ppt = Presentation()
# Load a PowerPoint presentation
ppt.LoadFromFile("Sample.pptx")

# Get the first slide
slide = ppt.Slides[0]

# Add a notes slide to the slide
notesSlide = slide.AddNotesSlide()

# Add 4 paragraphs to the notes slide
paragraph = TextParagraph()
paragraph.Text = "Tips for making effective presentations:"
notesSlide.NotesTextFrame.Paragraphs.Append(paragraph)

paragraph = TextParagraph()
paragraph.Text = "Use the slide master feature to create a consistent and simple design template."
notesSlide.NotesTextFrame.Paragraphs.Append(paragraph)

paragraph = TextParagraph()
paragraph.Text = "Simplify and limit the number of words on each screen."
notesSlide.NotesTextFrame.Paragraphs.Append(paragraph)

paragraph = TextParagraph()
paragraph.Text = "Use contrasting colors for text and background."
notesSlide.NotesTextFrame.Paragraphs.Append(paragraph)

# Set bullet type and style for specific paragraphs
for i in range(1, notesSlide.NotesTextFrame.Paragraphs.Count):
    notesSlide.NotesTextFrame.Paragraphs[i].BulletType = TextBulletType.Numbered
    notesSlide.NotesTextFrame.Paragraphs[i].BulletStyle = NumberedBulletStyle.BulletArabicPeriod

# Save the resulting presentation
ppt.SaveToFile("AddSpeakerNotes.pptx", FileFormat.Pptx2016)
ppt.Dispose()

Read Speaker Notes in PowerPoint in Python
To read the text content of the notes, you can use the NotesSlide.NotesTextFrame.Text property. The detailed steps are as follows.
- Create a Presentation object.
- Load a PowerPoint presentation using Presentation.LoadFromFile() method.
- Get the slide that you want to read notes from using Presentation.Slides[index] property.
- Get the notes slide of the slide using ISlide.NotesSlide property.
- Get the text content of the notes slide using NotesSlide.NotesTextFrame.Text property.
- Write the text content into a text file.
- Python
from spire.presentation.common import *
from spire.presentation import *

# Create a Presentation object
ppt = Presentation()
# Load a PowerPoint presentation
ppt.LoadFromFile("AddSpeakerNotes.pptx")

# Get the first slide
slide = ppt.Slides[0]

# Get the notes slide of the slide
notesSlide = slide.NotesSlide

# Get the text content of the notes slide
notes = notesSlide.NotesTextFrame.Text

# Write the text content to a text file
with open("Notes.txt", 'w') as file:
    file.write(notes)

ppt.Dispose()

Delete Speaker Notes from PowerPoint in Python
You can delete a specific paragraph of note or delete all the notes from a slide using the NotesSlide.NotesTextFrame.Paragraphs.RemoveAt(index) or NotesSlide.NotesTextFrame.Paragraphs.Clear() method. The detailed steps are as follows.
- Create a Presentation object.
- Load a PowerPoint presentation using Presentation.LoadFromFile() method.
- Get the slide that you want to delete notes from using Presentation.Slides[index] property.
- Get the notes slide of the slide using ISlide.NotesSlide property.
- Delete a specific paragraph of note or delete all the notes from the notes slide using the NotesSlide.NotesTextFrame.Paragraphs.RemoveAt(index) or NotesSlide.NotesTextFrame.Paragraphs.Clear() method.
- Save the resulting presentation using Presentation.SaveToFile() method.
- Python
from spire.presentation.common import *
from spire.presentation import *

# Create a Presentation object
presentation = Presentation()
# Load a PowerPoint presentation
presentation.LoadFromFile("AddSpeakerNotes.pptx")

# Get the first slide
slide = presentation.Slides[0]

# Get the notes slide of the slide
notesSlide = slide.NotesSlide

# Remove a specific paragraph of note from the notes slide
# notesSlide.NotesTextFrame.Paragraphs.RemoveAt(1)

# Remove all the notes from the notes slide
notesSlide.NotesTextFrame.Paragraphs.Clear()

# Save the resulting presentation
presentation.SaveToFile("DeleteSpeakerNotes.pptx", FileFormat.Pptx2013)
presentation.Dispose()

Apply for a Temporary License
If you'd like to remove the evaluation message from the generated documents, or to get rid of the function limitations, please request a 30-day trial license for yourself.
Python: Create, Read or Delete SmartArt in PowerPoint
SmartArt in Microsoft PowerPoint is a valuable tool that allows users to create visually appealing diagrams, charts, and graphics to represent information or concepts. It provides a quick and easy way to transform plain text into visually engaging visuals, making it easier for the audience to understand and remember the information being presented. In this article, we will demonstrate how to create, read and delete SmartArt in a PowerPoint in Python using Spire.Presentation for Python.
- Create SmartArt in PowerPoint in Python
- Read SmartArt in PowerPoint in Python
- Delete SmartArt from PowerPoint in Python
Install Spire.Presentation for Python
This scenario requires Spire.Presentation for Python and plum-dispatch v1.7.4. They can be easily installed in your Windows through the following pip command.
pip install Spire.Presentation
If you are unsure how to install, please refer to this tutorial: How to Install Spire.Presentation for Python on Windows
Create SmartArt in PowerPoint in Python
Spire.Presentation for Python provides the ISlide.Shapes.AppendSmartArt() method to add a SmartArt graphic to a specific slide of a PowerPoint presentation. The detailed steps are as follows.
- Create an object of the Presentation class.
- Load a PowerPoint presentation using Presentation.LoadFromFile() method.
- Get a specified slide by its index using Presentation.Slides[index] property.
- Insert a SmartArt graphic into the specified slide using ISlide.Shapes.AppendSmartArt() method.
- Set the style and color of the SmartArt using ISmartArt.Style and ISmartArt.ColorStyle properties.
- Loop through the nodes in the SmartArt and remove all default nodes using ISmartArt.Nodes.RemoveNode() method.
- Add a node to the SmartArt using ISmartArt.Nodes.AddNode() method.
- Add two sub-nodes to the node using ISmartArtNode.ChildNodes.AddNode() method.
- Add two sub-nodes to the first sub-node and the second sub-node respectively using ISmartArtNode.ChildNodes.AddNode() method.
- Add text to each node and sub-node using ISmartArtNode.TextFrame.Text property, and then set the font size for the text using ISmartArtNode.TextFrame.TextRange.FontHeight property.
- Save the resulting presentation using Presentation.SaveToFile() method.
- Python
from spire.presentation.common import *
from spire.presentation import *

# Create a Presentation object
presentation = Presentation()
# Load a PowerPoint presentation
presentation.LoadFromFile("Sample.pptx")

# Get the first slide
slide = presentation.Slides[0]

# Add a SmartArt (Organization Chart) to the slide
smartArt = slide.Shapes.AppendSmartArt(200, 60, 500, 430, SmartArtLayoutType.OrganizationChart)

# Set style and color for the SmartArt
smartArt.Style = SmartArtStyleType.ModerateEffect
smartArt.ColorStyle = SmartArtColorType.ColorfulAccentColors5to6

# Remove the default nodes from the SmartArt
list = []
for node in smartArt.Nodes:
    list.append(node)
for subnode in list:
    smartArt.Nodes.RemoveNode(subnode)

# Add a node to the SmartArt
node = smartArt.Nodes.AddNode()

# Add two sub-nodes to the node
subNode1 = node.ChildNodes.AddNode()
subNode2 = node.ChildNodes.AddNode()

# Add two sub-nodes to the first sub-node
subsubNode1 = subNode1.ChildNodes.AddNode()
subsubNode2 = subNode1.ChildNodes.AddNode()
# Add two sub-nodes to the second sub-node
subsubNode3 = subNode2.ChildNodes.AddNode()
subsubNode4 = subNode2.ChildNodes.AddNode()

# Set text and font size for the node and sub-nodes
node.TextFrame.Text = "CEO"
node.TextFrame.TextRange.FontHeight = 14.0
subNode1.TextFrame.Text = "Development Manager"
subNode1.TextFrame.TextRange.FontHeight = 12.0
subNode2.TextFrame.Text = "Quality Assurance Manager"
subNode2.TextFrame.TextRange.FontHeight = 12.0
subsubNode1.TextFrame.Text = "Developer A"
subsubNode1.TextFrame.TextRange.FontHeight = 12.0
subsubNode2.TextFrame.Text = "Developer B"
subsubNode2.TextFrame.TextRange.FontHeight = 12.0
subsubNode3.TextFrame.Text = "Tester A"
subsubNode3.TextFrame.TextRange.FontHeight = 12.0
subsubNode4.TextFrame.Text = "Tester B"
subsubNode4.TextFrame.TextRange.FontHeight = 12.0

# Save the resulting presentation
presentation.SaveToFile("InsertSmartArt.pptx", FileFormat.Pptx2016)
presentation.Dispose()

Read SmartArt in PowerPoint in Python
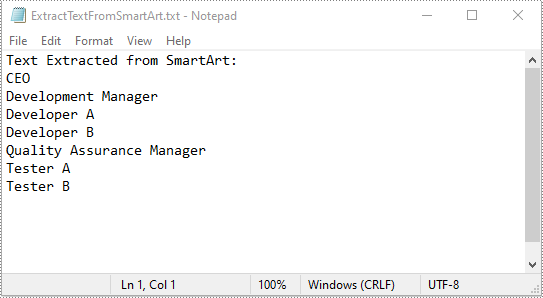
To read the text of SmartArt graphics on a PowerPoint slide, you need to find the SmartArt shapes on the slide, then loop through all nodes of each SmartArt shape, and finally retrieve the text of each node through the ISmartArtNode.TextFrame.Text property. The detailed steps are as follows.
- Create an object of the Presentation class.
- Load a PowerPoint presentation using Presentation.LoadFromFile() method.
- Get a specific slide using Presentation.Slides[index] property.
- Create a list to store the extracted text.
- Loop through all the shapes on the slide.
- Check if the shapes are of ISmartArt type. If the result is True, loop through all the nodes of each SmartArt shape, then retrieve the text from each node through ISmartArtNode.TextFrame.Text property and append the text to the list.
- Write the text in the list into a text file.
- Python
from spire.presentation.common import *
from spire.presentation import *

# Create a Presentation object
presentation = Presentation()
# Load a PowerPoint presentation
presentation.LoadFromFile("InsertSmartArt.pptx")

# Get the first slide
slide = presentation.Slides[0]

# Create a list to store the extracted text
str = []
str.append("Text Extracted from SmartArt:")

# Loop through the shapes on the slide and find the SmartArt shapes
for shape in slide.Shapes:
    if isinstance(shape, ISmartArt):
        smartArt = shape
        # Extract text from the SmartArt shapes and append the text to the list
        for node in smartArt.Nodes:
            str.append(node.TextFrame.Text)

# Write the text in the list into a text file
with open("ExtractTextFromSmartArt.txt", "w", encoding = "utf-8") as text_file:
    for text in str:
        text_file.write(text + "\n")

presentation.Dispose()
Delete SmartArt from PowerPoint in Python
To delete SmartArt graphics from a PowerPoint slide, you need to loop through all the shapes on the slide, find the SmartArt shapes and then delete them from the slide using ISlide.Shapes.Remove() method. The detailed steps are as follows.
- Create an object of the Presentation class.
- Load a PowerPoint presentation using Presentation.LoadFromFile() method.
- Get a specific slide using Presentation.Slides[index] property.
- Create a list to store the SmartArt shapes.
- Loop through all the shapes on the slide.
- Check if the shapes are of ISmartArt type. If the result is True, append them to the list.
- Loop through the SmartArt shapes in the list, then remove them from the slide one by one using ISlide.Shapes.Remove() method.
- Save the resulting presentation using Presentation.SaveToFile() method.
- Python
from spire.presentation.common import *
from spire.presentation import *

# Create a Presentation object
presentation = Presentation()
# Load a PowerPoint presentation
presentation.LoadFromFile("InsertSmartArt.pptx")

# Get the first slide
slide = presentation.Slides[0]

# Create a list to store the SmartArt shapes
list = []

# Loop through all the shapes on the slide
for shape in slide.Shapes:
    # Find the SmartArt shapes and append them to the list
    if isinstance (shape, ISmartArt):
        list.append(shape)

# Remove the SmartArt from the slide
for smartArt in list:
    slide.Shapes.Remove(smartArt)

# Save the resulting presentation
presentation.SaveToFile("DeleteSmartArt.pptx", FileFormat.Pptx2016)
presentation.Dispose()
Apply for a Temporary License
If you'd like to remove the evaluation message from the generated documents, or to get rid of the function limitations, please request a 30-day trial license for yourself.
Python: Hide or Show Slides in PowerPoint Presentations
Hiding and showing slides are two practical features in PowerPoint that allow you to control the visibility of slides during a slideshow. Hiding slides is useful when you want to skip certain slides or temporarily remove them from the presentation without deleting them. Whereas showing slides is helpful when you want to re-display the hidden slides. In this article, we will demonstrate how to hide and show slides in a PowerPoint presentation in Python using Spire.Presentation for Python.
- Hide a Specific Slide in PowerPoint in Python
- Show a Hidden Slide in PowerPoint in Python
- Show All Hidden Slides in PowerPoint in Python
Install Spire.Presentation for Python
This scenario requires Spire.Presentation for Python and plum-dispatch v1.7.4. They can be easily installed in your Windows through the following pip command.
pip install Spire.Presentation
If you are unsure how to install, please refer to this tutorial: How to Install Spire.Presentation for Python on Windows
Hide a Specific Slide in PowerPoint in Python
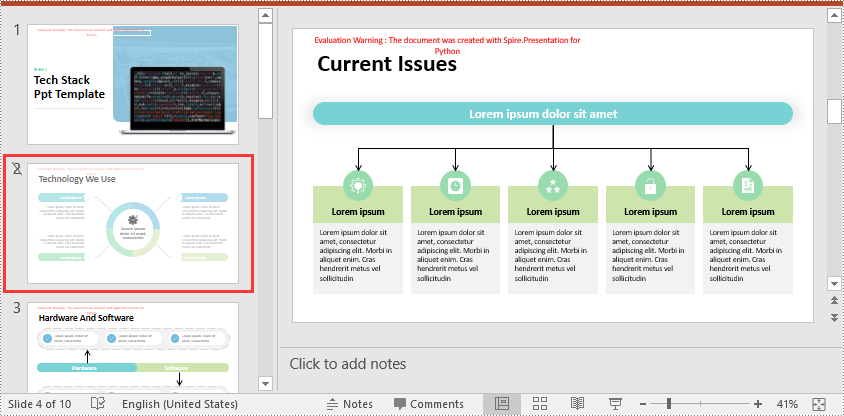
Spire.Presentation for Python provides the ISlide.Hidden property to control the visibility of a slide during a slideshow. If you don’t want a certain slide to be shown, you can hide this slide by setting the ISlide.Hidden property as True. The detailed steps are as follows.
- Create an object of the Presentation class.
- Load a PowerPoint presentation using Presentation.LoadFromFile() method.
- Get a specific slide using Presentation.Slides[index] property.
- Hide the slide by setting the ISlide.Hidden property as True.
- Save the resulting presentation using Presentation.SaveToFile() method.
- Python
from spire.presentation.common import *
from spire.presentation import *

# Create an object of the Presentation class
ppt = Presentation()
# Load a PowerPoint presentation
ppt.LoadFromFile("Sample.pptx")

# Get the second slide and hide it
slide = ppt.Slides[1]
slide.Hidden = True

# Save the resulting presentation to a new .pptx file
ppt.SaveToFile("HideSlide.pptx", FileFormat.Pptx2016)
ppt.Dispose()
Show a Hidden Slide in PowerPoint in Python
To show a hidden slide, you can set the ISlide.Hidden property as False. The detailed steps are as follows.
- Create an object of the Presentation class.
- Load a PowerPoint presentation using Presentation.LoadFromFile() method.
- Get a specific slide using Presentation.Slides[index] property.
- Unhide the slide by setting the ISlide.Hidden property as False.
- Save the resulting presentation using Presentation.SaveToFile() method.
- Python
from spire.presentation.common import *
from spire.presentation import *

# Create an object of the Presentation class
ppt = Presentation()
# Load a PowerPoint presentation
ppt.LoadFromFile("HideSlide.pptx")

# Get the second slide and unhide it
slide = ppt.Slides[1]
slide.Hidden = False

# Save the resulting presentation to a new .pptx file
ppt.SaveToFile("ShowSlide.pptx", FileFormat.Pptx2016)
ppt.Dispose()

Show All Hidden Slides in PowerPoint in Python
To show all hidden slides in a PowerPoint presentation, you need to loop through all the slides in the presentation, then find the hidden slides and unhide them by setting the ISlide.Hidden property as False. The detailed steps are as follows.
- Create an object of the Presentation class.
- Load a PowerPoint presentation using Presentation.LoadFromFile() method.
- Loop through the slides in the presentation.
- Check whether the current slide is hidden or not using ISlide.Hidden property. If the result is true, unhide the slide by setting the ISlide.Hidden property as False.
- Save the resulting presentation using Presentation.SaveToFile() method.
- Python
from spire.presentation.common import *
from spire.presentation import *

# Create an object of the Presentation class
ppt = Presentation()
# Load a PowerPoint presentation
ppt.LoadFromFile("Sample2.pptx")

# Loop through each slide in the presentation
for i in range(ppt.Slides.Count):
    slide = ppt.Slides[i]
    # Check if the slide is hidden
    if(slide.Hidden):
        # Unhide the slide
        slide.Hidden = False

# Save the resulting presentation to a new .pptx file
ppt.SaveToFile("ShowAllHidenSlides.pptx", FileFormat.Pptx2016)
ppt.Dispose()
Apply for a Temporary License
If you'd like to remove the evaluation message from the generated documents, or to get rid of the function limitations, please request a 30-day trial license for yourself.
Python: Add or Delete Slides in PowerPoint Presentations
Adding and deleting slides in PowerPoint are essential actions that allow presenters to control the structure and content of their presentations. Adding slides provides the opportunity to expand and enhance the presentation by introducing new topics or providing supporting information. On the other hand, deleting slides helps streamline the presentation by removing redundant, repetitive, or irrelevant content. In this article, we will demonstrate how to add or delete slides in a PowerPoint Presentation in Python using Spire.Presentation for Python.
- Add a New Slide at the End of the PowerPoint Document in Python
- Insert a New Slide Before a Specific Slide in PowerPoint in Python
- Delete a Specific Slide from a PowerPoint Document in Python
Install Spire.Presentation for Python
This scenario requires Spire.Presentation for Python and plum-dispatch v1.7.4. They can be easily installed in your Windows through the following pip command.
pip install Spire.Presentation
If you are unsure how to install, please refer to this tutorial: How to Install Spire.Presentation for Python on Windows
Add a New Slide at the End of the PowerPoint Document in Python
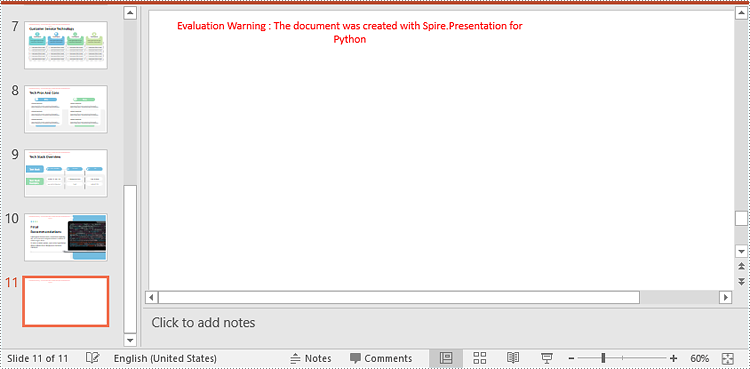
Spire.Presentation for Python provides the Presentation.Slides.Append() method to add a new slide after the last slide of a PowerPoint presentation. The detailed steps are as follows.
- Create an object of the Presentation class.
- Load a PowerPoint presentation using Presentation.LoadFromFile() method.
- Add a new blank slide at the end of the presentation using Presentation.Slides.Append() method.
- Save the result presentation using Presentation.SaveToFile() method.
- Python
from spire.presentation.common import *
from spire.presentation import *

# Create a Presentation object
presentation = Presentation()

# Load a PowerPoint presentation
presentation.LoadFromFile("Sample.pptx")

# Add a new slide at the end of the presentation
presentation.Slides.Append()

# Save the result presentation to a .pptx file
presentation.SaveToFile("AddSlide.pptx", FileFormat.Pptx2013)
presentation.Dispose()
Insert a New Slide Before a Specific Slide in PowerPoint in Python
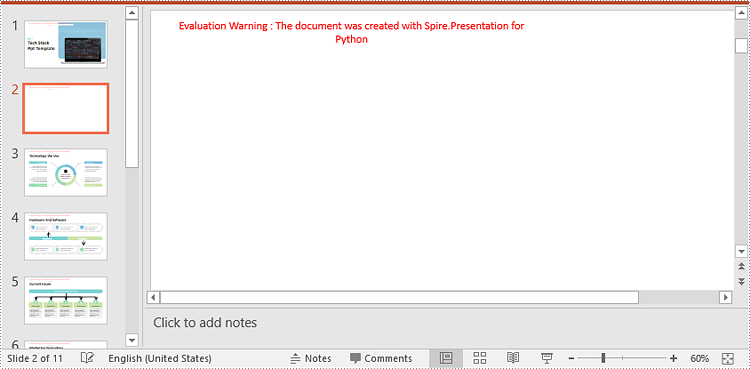
You can use the Presentation.Slides.Insert() method to insert a new slide before a specific slide of a PowerPoint presentation. The detailed steps are as follows.
- Create an object of the Presentation class.
- Load a PowerPoint presentation using Presentation.LoadFromFile() method.
- Insert a blank slide before a specific slide using Presentation.Slides.Insert() method.
- Save the result presentation using Presentation.SaveToFile() method.
- Python
from spire.presentation.common import *
from spire.presentation import *

# Create a Presentation object
presentation = Presentation()

# Load a PowerPoint presentation
presentation.LoadFromFile("Sample.pptx")

# Insert a blank slide before the second slide
presentation.Slides.Insert(1)

# Save the result presentation to a .pptx file
presentation.SaveToFile("InsertSlide.pptx", FileFormat.Pptx2013)
presentation.Dispose()
Delete a Specific Slide from a PowerPoint Document in Python
To delete a specific slide from a PowerPoint presentation, you can use the Presentation.Slides.RemoveAt() method. The detailed steps are as follows.
- Create an object of the Presentation class.
- Load a PowerPoint presentation using Presentation.LoadFromFile() method.
- Remove a specific slide from the presentation using Presentation.Slides.RemoveAt() method.
- Save the result presentation using Presentation.SaveToFile() method.
- Python
from spire.presentation.common import *
from spire.presentation import *

# Create a Presentation object
presentation = Presentation()

# Load a PowerPoint presentation
presentation.LoadFromFile("Sample.pptx")

# Remove the first slide
presentation.Slides.RemoveAt(0)

# Save the result presentation to a .pptx file
presentation.SaveToFile("RemoveSlide.pptx", FileFormat.Pptx2013)
presentation.Dispose()

Apply for a Temporary License
If you'd like to remove the evaluation message from the generated documents, or to get rid of the function limitations, please request a 30-day trial license for yourself.