C#: Add or Delete Rows and Columns in Word Tables
The ability to add or delete rows and columns in a Word table is crucial for maintaining the accuracy, clarity, and relevance of the information presented. By adding additional rows and columns, you can modify the original structure of a table to accommodate changes in the underlying data. Conversely, removing unnecessary rows and columns helps to streamline your document and make it easier to read. In this article, you will learn how to add or delete table rows and columns in Word in C# using Spire.Doc for .NET.
- Add or Insert Rows in a Word Table in C#
- Add or Insert Columns in a Word Table in C#
- Delete Rows and Columns from a Word Table in C#
Install Spire.Doc for .NET
To begin with, you need to add the DLL files included in the Spire.Doc for.NET package as references in your .NET project. The DLL files can be either downloaded from this link or installed via NuGet.
PM> Install-Package Spire.Doc
Add or Insert Rows in a Word Table in C#
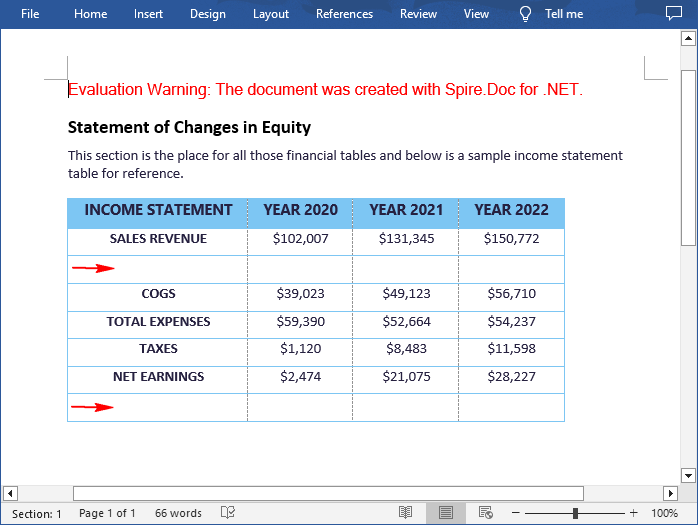
Spire.Doc for .NET allows to add a row to the end of a Word table or insert a row at a specific location in a Word table using the Table.AddRow() or Table.Rows.Insert() method. The following are the detailed steps.
- Create a Document object.
- Load a Word document using Document.LoadFromFile() method.
- Get the first section using Document.Sections[] property.
- Get a specified table in the section using Section.Tables[] property.
- Insert a row at a specific location in the table using Table.Rows.Insert(intindex, TableRow row) method.
- Add a row to the end of the table using Table.AddRow() method.
- Save the result document using Document.SaveToFile() method.
- C#
using Spire.Doc;

namespace AddRows
{
    class Program
    {
        static void Main(string[] args)
        {
            //Create a Document object
            Document doc = new Document();

            //Load a Word document
            doc.LoadFromFile("Tables.docx");

            //Get the first section
            Section section = doc.Sections[0];

            //Get the first table in the section
            Table table = section.Tables[0] as Table;

            //Insert a row into the table as the third row
            table.Rows.Insert(2, table.AddRow());

            //Add a row at the end of the table
            table.AddRow();

            //Save the result document
            doc.SaveToFile("AddRows.docx", FileFormat.Docx2016);
        }
    }
}
Add or Insert Columns in a Word Table in C#
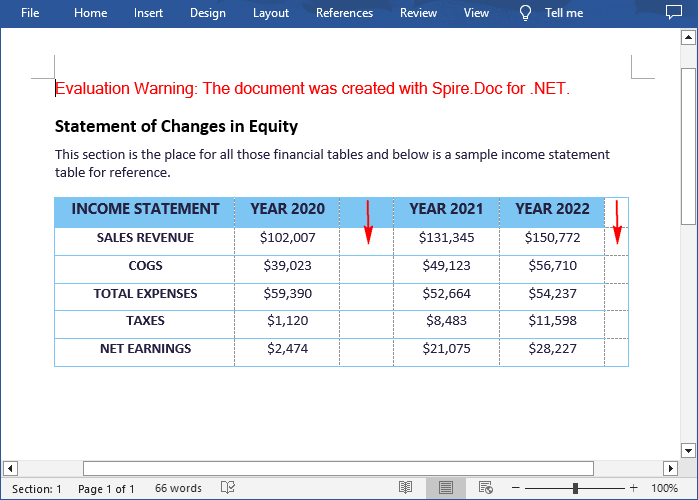
Spire.Doc for .NET does not have a direct method for adding or inserting columns in a Word table. However, you can achieve this task by adding or inserting cells at a specific location in each table row using the TableRow.AddCell() or TableRow.Cells.Insert() method. The following are the detailed steps.
- Create a Document object.
- Load a Word document using Document.LoadFromFile() method.
- Get the first section using Document.Sections[] property.
- Get a specified table in the section using Section.Tables[] property.
- Loop through to get each row in the table.
- Create a TableCell object, and then insert it at a specific location in each row using TableRow.Cells.Insert() method.
- Set the cell width using TableRow.Cells[].SetCellWidth() method.
- Add a cell to the end of each row using TableRow.AddCell() method.
- Save the result document using Document.SaveToFile() method.
- C#
using Spire.Doc;

namespace AddColumns
{
    class Program
    {
        static void Main(string[] args)
        {
            //Create a Document object
            Document doc = new Document();

            //Load a Word document
            doc.LoadFromFile("Tables.docx");

            //Get the first section
            Section section = doc.Sections[0];

            //Get the first table in the section
            Table table = section.Tables[0] as Table;

            //Loop through the rows in the table
            for (int i = 0; i < table.Rows.Count; i++)
            {
                //Get a specified row
                TableRow row = table.Rows[i];

                //Create a TableCell object
                TableCell cell = new TableCell(table.Document);

                //Insert the cell as the third cell of the row
                row.Cells.Insert(2, cell);

                //Set the cell width
                row.Cells[2].SetCellWidth(40, CellWidthType.Point);

                //Add a cell to the end of the row
                row.AddCell();
            }

            //Save the result document
            doc.SaveToFile("AddColumns.docx", FileFormat.Docx2016);

        }
    }
}
Delete Rows and Columns from a Word Table in C#
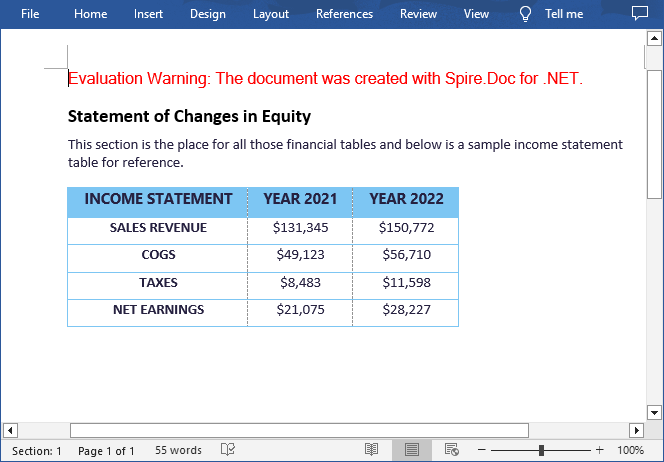
To remove a specific row from a Word table, you can use the Table.Rows.RemoveAt() method directly. While to remove a specific column, you need to remove the corresponding cell from each table row using the TableRow.Cells.RemoveAt() method. The following are the detailed steps.
- Create a Document object.
- Load a Word document using Document.LoadFromFile() method.
- Get the first section using Document.Sections[] property.
- Get a specified table in the section using Section.Tables[] property.
- Remove a specific row from the table using Table.Rows.RemoveAt(int index) method.
- Loop through to get each row in the table.
- Remove a specific cell from each row using TableRow.Cells.RemoveAt(int index) method.
- Save the result document using Document.SaveToFile() method.
- C#
using Spire.Doc;

namespace AddColumns
{
    class Program
    {
        static void Main(string[] args)
        {
            //Create a Document object
            Document doc = new Document();

            //Load a Word document
            doc.LoadFromFile("Tables.docx");

            //Get the first section
            Section section = doc.Sections[0];

            //Get the first table in the section
            Table table = section.Tables[0] as Table;

            //Remove the 4th row
            table.Rows.RemoveAt(3);

            //Loop through the rows in the table
            for (int i = 0; i < table.Rows.Count; i++)
            {
                //Get a specified row
                TableRow row = table.Rows[i];

                //Remove the 2nd cell from the row
                row.Cells.RemoveAt(1);
            }

            //Save the result document
            doc.SaveToFile("RemoveRowsColumns.docx", FileFormat.Docx2016);

        }
    }
}
Apply for a Temporary License
If you'd like to remove the evaluation message from the generated documents, or to get rid of the function limitations, please request a 30-day trial license for yourself.
How to set Vertical Alignment for table in Word via Spire.Doc
Set vertical alignment for table can show contents in different positions. There are three options including Top, Bottom, Middle. Default is Middle. This article talk about how to set vertical alignment for tables via Spire.Doc, the following is the detailed steps:
Step 1: Create a new Word document and add a new section.
Document document = new Document();
Section section = document.AddSection();
Step 2: Add a table with 3 columns and 3 rows. You can set showBoder property as true when you creating the table. Merge the first column as one cell.
Table table = section.AddTable(true);
table.ResetCells(3, 3);
table.ApplyVerticalMerge(0, 0, 2);
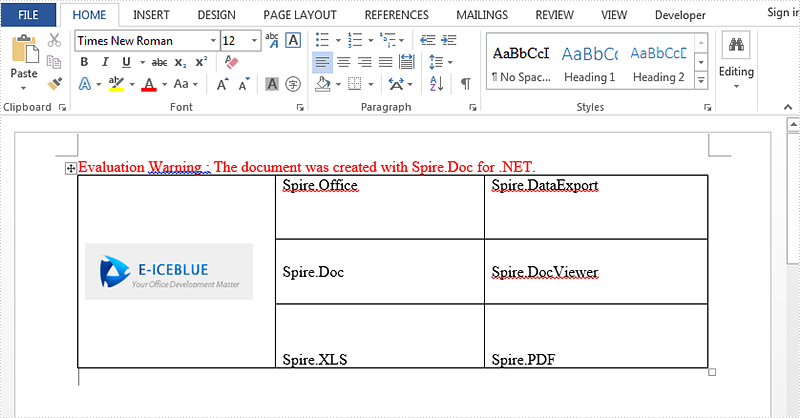
Step 3: Set the vertical alignment for each cell, default is top. Here we set the first row as Top, second row as Middle, third row as Bottom.
table.Rows[0].Cells[0].CellFormat.VerticalAlignment = VerticalAlignment.Middle;
table.Rows[0].Cells[1].CellFormat.VerticalAlignment = VerticalAlignment.Top;
table.Rows[0].Cells[2].CellFormat.VerticalAlignment = VerticalAlignment.Top;
table.Rows[1].Cells[1].CellFormat.VerticalAlignment = VerticalAlignment.Middle;
table.Rows[1].Cells[2].CellFormat.VerticalAlignment = VerticalAlignment.Middle;
table.Rows[2].Cells[1].CellFormat.VerticalAlignment = VerticalAlignment.Bottom;
table.Rows[2].Cells[2].CellFormat.VerticalAlignment = VerticalAlignment.Bottom;
Step 4: Append data to table.
Paragraph paraPic = table.Rows[0].Cells[0].AddParagraph();
DocPicture pic = paraPic.AppendPicture(Image.FromFile("1.png"));

String[][] data = {
                       new string[] {"","Spire.Office","Spire.DataExport"},
                       new string[] {"","Spire.Doc","Spire.DocViewer"},
                       new string[] {"","Spire.XLS","Spire.PDF"}
                            };

      for (int r = 0; r < 3; r++)
      {
        TableRow dataRow = table.Rows[r];
        dataRow.Height = 50;
        for (int c = 0; c < 3; c++)
           {
             if (c == 1)
               {
                  Paragraph par = dataRow.Cells[c].AddParagraph();
                  par.AppendText(data[r][c]);
                  dataRow.Cells[c].Width = (section.PageSetup.ClientWidth) / 2;
                }
             if (c == 2)
                {
                  Paragraph par = dataRow.Cells[c].AddParagraph();
                  par.AppendText(data[r][c]);
                  dataRow.Cells[c].Width = (section.PageSetup.ClientWidth) / 2;
                 }
              }
         }
Step 5: Save and review.
document.SaveToFile(@"result.docx", FileFormat.Docx2013);
System.Diagnostics.Process.Start(@"result.docx");
Result screenshot:
Full code:
using Spire.Doc;
using Spire.Doc.Documents;
using Spire.Doc.Fields;
using System;
using System.Drawing;
namespace SetVerticalAlignment
{
    class Program
    {

        static void Main(string[] args)
        {

            Document document = new Document();
            Section section = document.AddSection();

            Table table = section.AddTable(true);
            table.ResetCells(3, 3);

            table.ApplyVerticalMerge(0, 0, 2);

            table.Rows[0].Cells[0].CellFormat.VerticalAlignment = VerticalAlignment.Middle;
            table.Rows[0].Cells[1].CellFormat.VerticalAlignment = VerticalAlignment.Top;
            table.Rows[0].Cells[2].CellFormat.VerticalAlignment = VerticalAlignment.Top;
            table.Rows[1].Cells[1].CellFormat.VerticalAlignment = VerticalAlignment.Middle;
            table.Rows[1].Cells[2].CellFormat.VerticalAlignment = VerticalAlignment.Middle;
            table.Rows[2].Cells[1].CellFormat.VerticalAlignment = VerticalAlignment.Bottom;
            table.Rows[2].Cells[2].CellFormat.VerticalAlignment = VerticalAlignment.Bottom;

            Paragraph paraPic = table.Rows[0].Cells[0].AddParagraph();
            DocPicture pic = paraPic.AppendPicture(Image.FromFile("1.png"));

            String[][] data = {
                       new string[] {"","Spire.Office","Spire.DataExport"},
                       new string[] {"","Spire.Doc","Spire.DocViewer"},
                       new string[] {"","Spire.XLS","Spire.PDF"}
                            };

            for (int r = 0; r < 3; r++)
            {
                TableRow dataRow = table.Rows[r];
                dataRow.Height = 50;
                for (int c = 0; c < 3; c++)
                {
                    if (c == 1)
                    {
                        Paragraph par = dataRow.Cells[c].AddParagraph();
                        par.AppendText(data[r][c]);
                        dataRow.Cells[c].Width = (section.PageSetup.ClientWidth) / 2;
                    }
                    if (c == 2)
                    {
                        Paragraph par = dataRow.Cells[c].AddParagraph();
                        par.AppendText(data[r][c]);
                        dataRow.Cells[c].Width = (section.PageSetup.ClientWidth) / 2;
                    }
                }
            }
            document.SaveToFile(@"result.docx", FileFormat.Docx2013);
            System.Diagnostics.Process.Start(@"result.docx");
        }
    }
}
Set position of table in Word Document as outside via Spire.Doc
Table in word document can make your data more logical and uncluttered, this article is talk about set absolute position of table in word document via Spire.Doc. Here try to realize placing a table on the right of an image on header.
Here are the steps:
Step 1: Create a new word document and add new section.
Document doc = new Document();
Section sec = doc.AddSection();
Step 2: Create header on Section[0].
HeaderFooter header = doc.Sections[0].HeadersFooters.Header;
Step 3: Add new paragraph on header and set HorizontalAlignment of the paragraph as left.
Paragraph paragraph = header.AddParagraph();
paragraph.Format.HorizontalAlignment = HorizontalAlignment.Left;
Step 4: Load an image for the paragraph.
DocPicture headerimage = paragraph.AppendPicture(Image.FromFile(@"1.png"));
Step 5: Add a table of 4 rows and 2 columns.
Table table = header.AddTable();
table.ResetCells(4, 2);
Step 6: Set the position of the table to the right of the image. Set WrapTextAround is true, HorizPositionAbs is outside, VertRelationTo is margin, and VertPosition is 43 to fit the height of the image.
table.TableFormat.WrapTextAround = true;
table.TableFormat.Positioning.HorizPositionAbs = HorizontalPosition.Outside;
table.TableFormat.Positioning.VertRelationTo = VerticalRelation.Margin;
table.TableFormat.Positioning.VertPosition = 43;
Step 7: Then add contents for the table, first column alignment set as left ,second column alignment set as right.
String[][] data = {
                    new string[] {"Spire.Doc.left","Spire XLS.right"},
                    new string[] {"Spire.Presentatio.left","Spire.PDF.right"},
                    new string[] {"Spire.DataExport.left","Spire.PDFViewe.right"},
                    new string []{"Spire.DocViewer.left","Spire.BarCode.right"}
                              };

            for (int r = 0; r < 4; r++)
            {
                TableRow dataRow = table.Rows[r];
                for (int c = 0; c < 2; c++)
                {
                    if (c == 0)
                    {
                        Paragraph par = dataRow.Cells[c].AddParagraph();
                        par.AppendText(data[r][c]);
                        par.Format.HorizontalAlignment = HorizontalAlignment.Left;
                        dataRow.Cells[c].Width = 180;
                    }
                    else
                    {
                        Paragraph par = dataRow.Cells[c].AddParagraph();
                        par.AppendText(data[r][c]);
                        par.Format.HorizontalAlignment = HorizontalAlignment.Right;
                        dataRow.Cells[c].Width = 180;
                    }
                }
            }
Step 8: Save the file and review it.
doc.SaveToFile("result.docx", FileFormat.Docx);
System.Diagnostics.Process.Start("result.docx");
Here is the screenshot:

Full Code:
using Spire.Doc;
using Spire.Doc.Documents;
using Spire.Doc.Fields;
using System;
using System.Drawing;
namespace SetPosition
{
    class Program
    {

        static void Main(string[] args)
        {

            Document doc = new Document();
            Section sec = doc.AddSection();

            HeaderFooter header = doc.Sections[0].HeadersFooters.Header;

            Paragraph paragraph = header.AddParagraph();
            paragraph.Format.HorizontalAlignment = HorizontalAlignment.Left;
            DocPicture headerimage = paragraph.AppendPicture(Image.FromFile(@"1.png"));

            Table table = header.AddTable();
            table.ResetCells(4, 2);

            table.TableFormat.WrapTextAround = true;
            table.TableFormat.Positioning.HorizPositionAbs = HorizontalPosition.Outside;
            table.TableFormat.Positioning.VertRelationTo = VerticalRelation.Margin;
            table.TableFormat.Positioning.VertPosition = 43;


            String[][] data = {
                    new string[] {"Spire.Doc.left","Spire XLS.right"},
                    new string[] {"Spire.Presentatio.left","Spire.PDF.right"},
                    new string[] {"Spire.DataExport.left","Spire.PDFViewe.right"},
                    new string []{"Spire.DocViewer.left","Spire.BarCode.right"}
                              };

            for (int r = 0; r < 4; r++)
            {
                TableRow dataRow = table.Rows[r];
                for (int c = 0; c < 2; c++)
                {
                    if (c == 0)
                    {
                        Paragraph par = dataRow.Cells[c].AddParagraph();
                        par.AppendText(data[r][c]);
                        par.Format.HorizontalAlignment = HorizontalAlignment.Left;
                        dataRow.Cells[c].Width = 180;
                    }
                    else
                    {
                        Paragraph par = dataRow.Cells[c].AddParagraph();
                        par.AppendText(data[r][c]);
                        par.Format.HorizontalAlignment = HorizontalAlignment.Right;
                        dataRow.Cells[c].Width = 180;
                    }
                }
            }
            doc.SaveToFile("result.docx",Spire.Doc.FileFormat.Docx);
            System.Diagnostics.Process.Start("result.docx");
        }
    }
}
How to Convert Embedded Excel Sheet to Word Table in C#, VB.NET
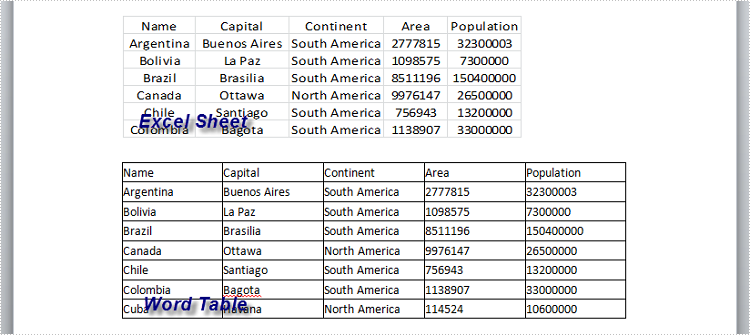
In our daily work, we may receive Word documents that will sometimes contain embedded Excel object (sheet) and we need to convert embedded Excel sheet to Word table so that we can easily change the date or format the table with style. In this article, you will learn how to convert embedded Excel sheet to Word table using Spire.Doc and Spire.XLS in C#, VB.NET.
Firstly, you need to download Spire.Office because Spire.Doc and Spire.XLS will be used in the same program. Add Spire.Doc.dll and Spire.XLS.dll as references in your VS project. Then follow the program guidance below to finish this work.
Step 1: Create a new Word document, load the sample file. Get the paragraph that contains the Excel object from the section. Initialize a new datatable.
Document doc = new Document("Sample.docx", Spire.Doc.FileFormat.Docx2010);
Section section = doc.Sections[0];
Paragraph para = section.Paragraphs[2];
DataTable dt = new DataTable();
Step 2: Traverse every DocumentObject in the paragraph, use IF statement to test if DocumentObject is OLE object, use another IF statement to test if OLE object type is Excel.Sheet.12. If yes, save the data of OLE object to a workbook through LoadFromStrem(). Then export data from worksheet to datatable.
foreach (DocumentObject obj in para.ChildObjects)
{
    if (DocumentObjectType.OleObject == obj.DocumentObjectType)
    {
        DocOleObject dObj = obj as DocOleObject;
        if (dObj.ObjectType == "Excel.Sheet.12")
        {
            Workbook wb = new Workbook();
            wb.LoadFromStream(new MemoryStream(dObj.NativeData));
            Worksheet ws = wb.Worksheets[0];
            dt = ws.ExportDataTable(ws.AllocatedRange, false);
        }
    }
}
Step 3: Create a new Word table and set row number and column number according to rows and columns of datatable. Export data from datatable to Word table.
Table table = section.AddTable(true);
 table.ResetCells(dt.Rows.Count, dt.Columns.Count);

 for (int i = 0; i < dt.Rows.Count; i++)
 {
     for (int j = 0; j < dt.Columns.Count; j++)
     {
         string text = dt.Rows[i][j] as string;
         table.Rows[i].Cells[j].AddParagraph().AppendText(text);
     }
 }
Step 4: Save the file.
doc.SaveToFile("Result.docx", Spire.Doc.FileFormat.Docx2010);
Result:
Full Code:
using Spire.Doc;
using Spire.Doc.Documents;
using Spire.Doc.Fields;
using Spire.Xls;
using System.Data;
using System.IO;
namespace ApplyTableStyles
{
    class Program
    {

        static void Main(string[] args)
        {

            Document doc = new Document("Sample.docx", Spire.Doc.FileFormat.Docx2010);
            Section section = doc.Sections[0];
            Paragraph para = section.Paragraphs[2];
            DataTable dt = new DataTable();

            foreach (DocumentObject obj in para.ChildObjects)
            {
                if (DocumentObjectType.OleObject == obj.DocumentObjectType)
                {
                    DocOleObject dObj = obj as DocOleObject;
                    if (dObj.ObjectType == "Excel.Sheet.12")
                    {
                        Workbook wb = new Workbook();
                        wb.LoadFromStream(new MemoryStream(dObj.NativeData));
                        Worksheet ws = wb.Worksheets[0];
                        dt = ws.ExportDataTable(ws.AllocatedRange, false);
                    }
                }
            }

            Table table = section.AddTable(true);
            table.ResetCells(dt.Rows.Count, dt.Columns.Count);

            for (int i = 0; i < dt.Rows.Count; i++)
            {
                for (int j = 0; j < dt.Columns.Count; j++)
                {
                    string text = dt.Rows[i][j] as string;
                    table.Rows[i].Cells[j].AddParagraph().AppendText(text);
                }
            }

            doc.SaveToFile("Result.docx", Spire.Doc.FileFormat.Docx2010);
        }
    }
}
Imports Spire.Doc
Imports Spire.Doc.Documents
Imports Spire.Doc.Fields
Imports Spire.Xls
Imports System.Data
Imports System.IO
Namespace ApplyTableStyles
	Class Program

		Private Shared Sub Main(args As String())

			Dim doc As New Document("Sample.docx", Spire.Doc.FileFormat.Docx2010)
			Dim section As Section = doc.Sections(0)
			Dim para As Paragraph = section.Paragraphs(2)
			Dim dt As New DataTable()

			For Each obj As DocumentObject In para.ChildObjects
				If DocumentObjectType.OleObject = obj.DocumentObjectType Then
					Dim dObj As DocOleObject = TryCast(obj, DocOleObject)
					If dObj.ObjectType = "Excel.Sheet.12" Then
						Dim wb As New Workbook()
						wb.LoadFromStream(New MemoryStream(dObj.NativeData))
						Dim ws As Worksheet = wb.Worksheets(0)
						dt = ws.ExportDataTable(ws.AllocatedRange, False)
					End If
				End If
			Next

			Dim table As Table = section.AddTable(True)
			table.ResetCells(dt.Rows.Count, dt.Columns.Count)

			For i As Integer = 0 To dt.Rows.Count - 1
				For j As Integer = 0 To dt.Columns.Count - 1
					Dim text As String = TryCast(dt.Rows(i)(j), String)
					table.Rows(i).Cells(j).AddParagraph().AppendText(text)
				Next
			Next

			doc.SaveToFile("Result.docx", Spire.Doc.FileFormat.Docx2010)
		End Sub
	End Class
End Namespace
Insert an existing Table by cloning in C#
In some case, we need make some modifications in an existing table but don't want destroy the original data, so we would like to copy the existing table then make some changes in the new table. How could we get the copied table? The easiest method is clone. There would introduce a solution to copy table and modify some data then insert the new table after original table via Spire.Doc.
Spire.Doc for .NET, a stand-alone .NET Word component, provides a method, Table.clone() to allow users to copy an existing table.
The main steps of the solution:
Firstly: load the word document with a table.
Document doc = new Document();
doc.LoadFromFile(@"CopyTable.doc");
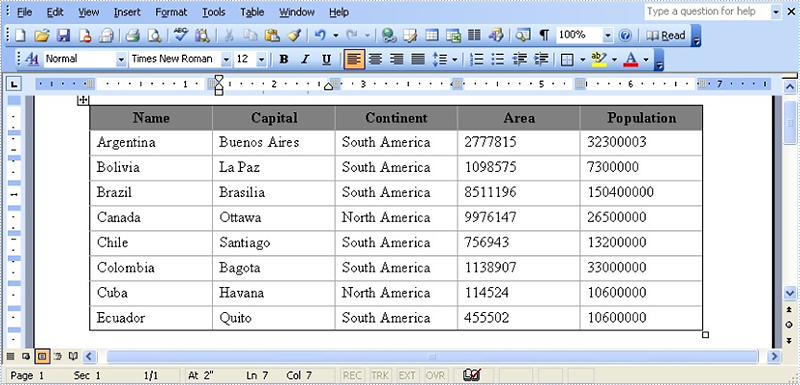
The original document effect screenshot:
Secondly: extract the existing table and call the table.clone () method to copy it.
Section se = doc.Sections[0];
Table original_Table =(Table) se.Tables[0];
Table copied_Table = original_Table.Clone();
Thirdly: extract the last row then traversal its cells to modify data.
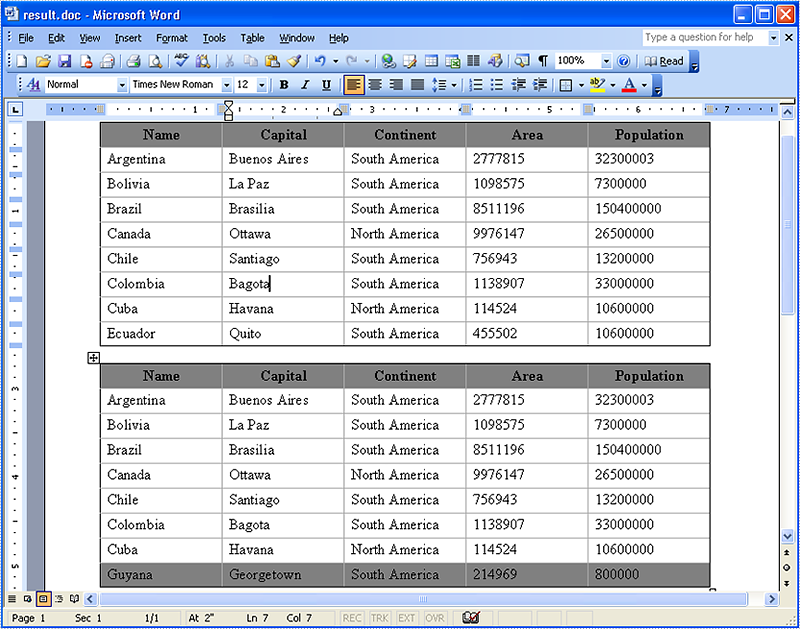
string[] st = new string[] { "Guyana", "Georgetown", "South America", "214969", "800000" };
//get the last row of copied table
TableRow lastRow = copied_Table.Rows[copied_Table.Rows.Count - 1];
//change lastRow data.
lastRow.RowFormat.BackColor = Color.Gray;
for (int i = 0; i < lastRow.Cells.Count; i++)
    {
    lastRow.Cells[i].Paragraphs[0].Text = st[i];
     }
Finally: call Section. tables.add() method to add the copied table in section and save this document.
se.Tables.Add(copied_Table);
doc.SaveToFile("result.doc", FileFormat.Doc);
The result document effect screenshot:
Full code:
using Spire.Doc;
using System.Drawing;

namespace InsertingaAnExistingTable
{
    class Program
    {
        static void Main(string[] args)
        {
//load a word document
            Document doc = new Document();
            doc.LoadFromFile(@"CopyTable.doc");

// extract the existing table
            Section se = doc.Sections[0];
            Table original_Table =(Table) se.Tables[0];

// copy the existing table to copied_Table via Table.clone()
            Table copied_Table = original_Table.Clone();
string[] st = new string[] { "Guyana", "Georgetown", "South America", "214969", "800000" };
            //get the last row of table
            TableRow lastRow = copied_Table.Rows[copied_Table.Rows.Count - 1];
            //change last row data.
            lastRow.RowFormat.BackColor = Color.Gray;
            for (int i = 0; i < lastRow.Cells.Count; i++)
            {
                lastRow.Cells[i].Paragraphs[0].Text = st[i];
            }
// add copied_Table in section
            se.Tables.Add(copied_Table);
            doc.SaveToFile("result.doc", FileFormat.Doc);
        }
    }
}
Apply Built-In Table Styles to Existing Word Tables in C#, VB.NET
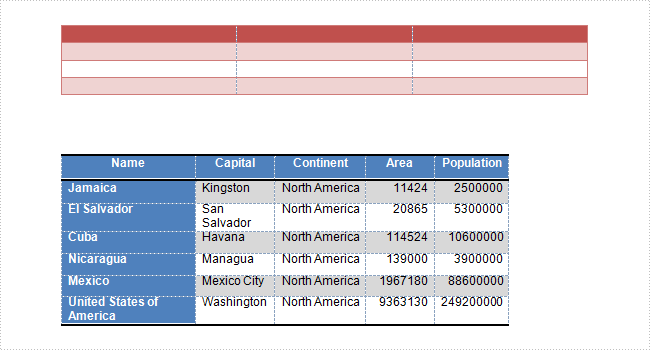
Every time we create a plain table in a Word document, we may want to change the style of the table so as to make it more vivid and attractive. In our previous article, we have demonstrated how to set Word table formatting with custom style. However, if we do not have much time to do so, we can apply built-in table styles to own a better appearance within a few minutes. This article focuses on how to apply built-in table styles to existing Word tables using Spire.Doc with C#, VB.NET.
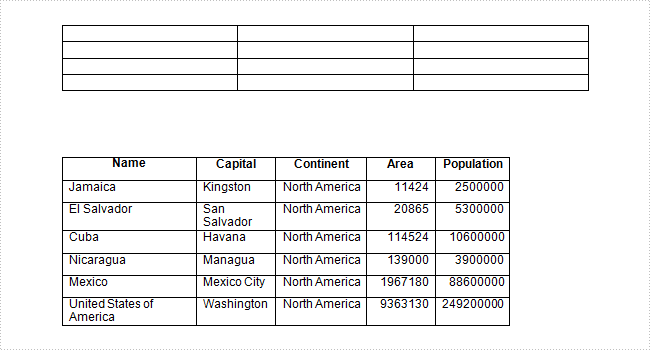
In the class of Spire.Doc.Table, it provides Table.ApplyStyle() method which enable us to easily change the layout of tables with default styles. As is shown below, here is a Word document that contains two plain tables in the first page. Let us see how we can format the table style with several lines of code.
Test File:
Code Snippet:
Step 1: Create a new Word document and load the test file.
Document doc = new Document("table.docx", FileFormat.Docx2010);
Step 2: Get the two tables from document.
Section section = doc.Sections[0];
Table table1 = section.Tables[0] as Table;
Table table2 = section.Tables[1] as Table;
Step 3: Apply tables with built-in table styles separately.
table1.ApplyStyle(DefaultTableStyle.MediumShading1Accent2);
table2.ApplyStyle(DefaultTableStyle.MediumShading2Accent1);
Step 4: Save the file.
doc.SaveToFile("result.docx", FileFormat.Docx);
Output:
Entire Code:
using Spire.Doc;
using Spire.Doc.Documents;
namespace ApplyTableStyles
{
    class Program
    {

        static void Main(string[] args)
        {

            Document doc = new Document("table.docx", FileFormat.Docx2010);
            Section section = doc.Sections[0];
            Table table1 = section.Tables[0] as Table;
            Table table2 = section.Tables[1] as Table;

            table1.ApplyStyle(DefaultTableStyle.MediumShading1Accent2);
            table2.ApplyStyle(DefaultTableStyle.MediumShading2Accent1);
            doc.SaveToFile("result.docx", FileFormat.Docx);

        }
    }
}
Imports Spire.Doc
Imports Spire.Doc.Documents
Namespace ApplyTableStyles
	Class Program

		Private Shared Sub Main(args As String())

			Dim doc As New Document("table.docx", FileFormat.Docx2010)
			Dim section As Section = doc.Sections(0)
			Dim table1 As Table = TryCast(section.Tables(0), Table)
			Dim table2 As Table = TryCast(section.Tables(1), Table)

			table1.ApplyStyle(DefaultTableStyle.MediumShading1Accent2)
			table2.ApplyStyle(DefaultTableStyle.MediumShading2Accent1)
			doc.SaveToFile("result.docx", FileFormat.Docx)

		End Sub
	End Class
End Namespace
How to replace text with table in a word document in C#
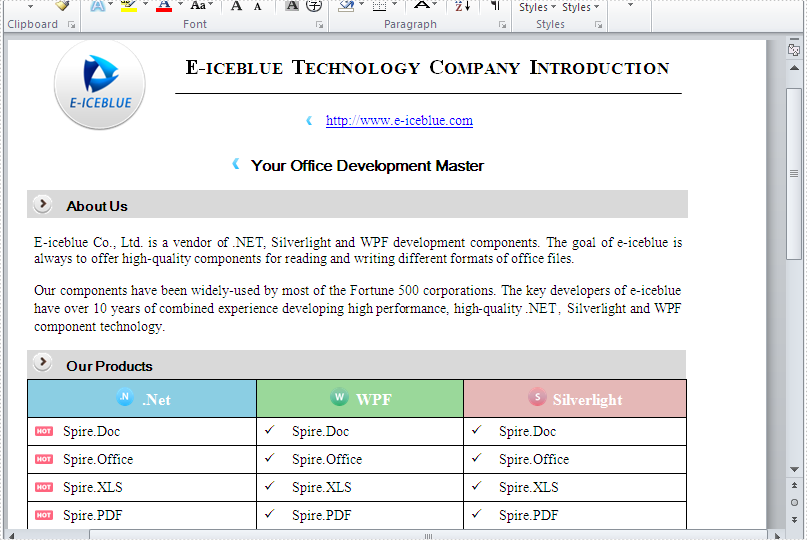
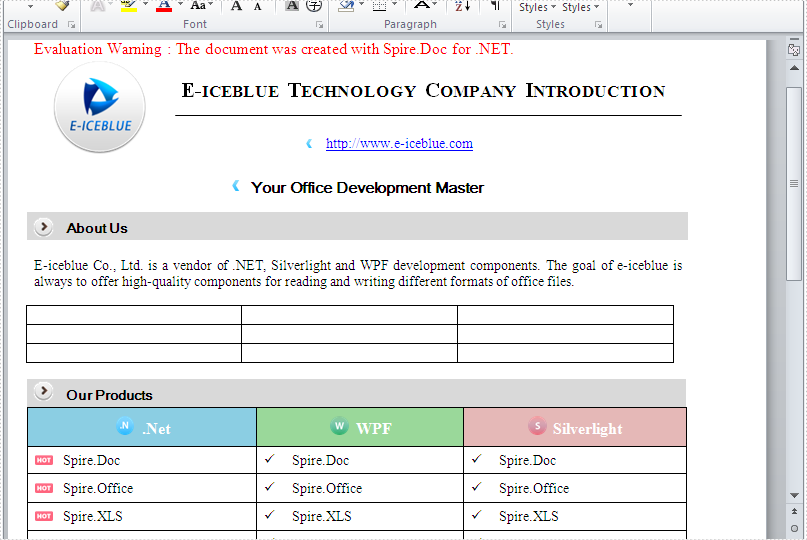
Spire.Doc has a powerful function of processing word table such as create and remove word table, set the table column width, style and so on. Spire.Doc also supports to add the table in the middle of the word document. This article will show you how to replace text with table by finding the key text in the word document.
Download and install Spire.Doc for .NET and then add Spire.Doc.dll as reference in the downloaded Bin folder though the below path: "..\Spire.Doc\Bin\NET4.0\ Spire.Doc.dll". Here comes to the details of how to finding the text and then replace it with table in C#.
Check the original word document at first:
Step 1: Create a new document and load from file.
Document doc = new Document();
doc.LoadFromFile("sample.docx");
Step 2: Find the place where you want to replace with table.
Section section = doc.Sections[0];
//"Fortune" as a "key text"
TextSelection selection = doc.FindString("Fortune", true, true);
TextRange range = selection.GetAsOneRange();
Paragraph paragraph = range.OwnerParagraph;
Body body = paragraph.OwnerTextBody;
int index = body.ChildObjects.IndexOf(paragraph);
Step 3: Add a table and set its style.
Table table = section.AddTable(true);
table.ResetCells(3,3);
Step 4: Remove the paragraph and insert the table.
body.ChildObjects.Remove(paragraph);
body.ChildObjects.Insert(index, table);
Step 5: Save the document to file.
doc.SaveToFile("Result.docx", FileFormat.Docx);
Effective screenshot of add a table in the middle of the word document by replacing the text.
Full codes:
namespace replaceTextwithTable
{
    class Program
    {
        static void Main(string[] args)
        {

            Document doc = new Document();
            doc.LoadFromFile("sample.docx");
            Section section = doc.Sections[0];
            TextSelection selection = doc.FindString("Fortune", true, true);
            TextRange range = selection.GetAsOneRange();
            Paragraph paragraph = range.OwnerParagraph;
            Body body = paragraph.OwnerTextBody;
            int index = body.ChildObjects.IndexOf(paragraph);
            Table table = section.AddTable(true);
            table.ResetCells(3,3);
            body.ChildObjects.Remove(paragraph);
             body.ChildObjects.Insert(index, table);
            doc.SaveToFile("Result.docx", FileFormat.Docx);
        }
    }
}
C#/VB.NET: Merge or Split Table Cells in Word
Merging cells means combining two or more cells into one larger cell, while splitting cells means dividing one cell into two or more smaller cells. When creating or editing tables in Microsoft Word, you may often need to merge or split table cells in order to better present your data. In this article, you will learn how to merge or split table cells in a Word document in C# and VB.NET using Spire.Doc for .NET.
Install Spire.Doc for .NET
To begin with, you need to add the DLL files included in the Spire.Doc for.NET package as references in your .NET project. The DLL files can be either downloaded from this link or installed via NuGet.
PM> Install-Package Spire.Doc
Merge Table Cells in Word Using C# and VB.NET
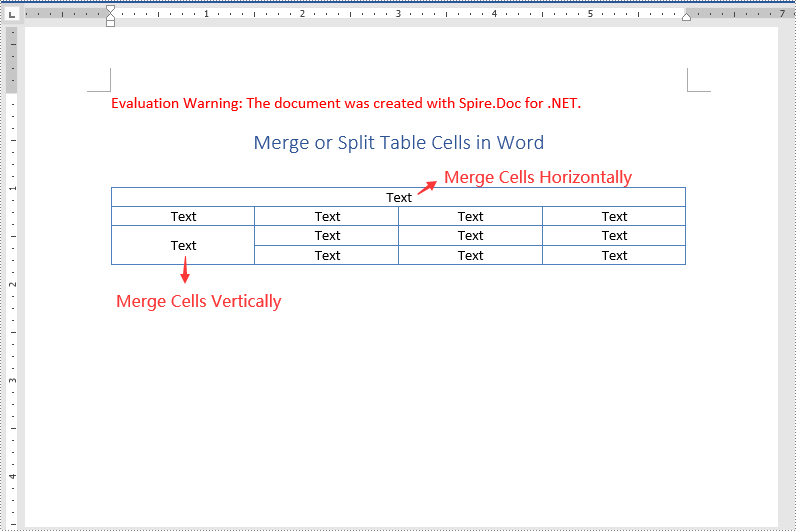
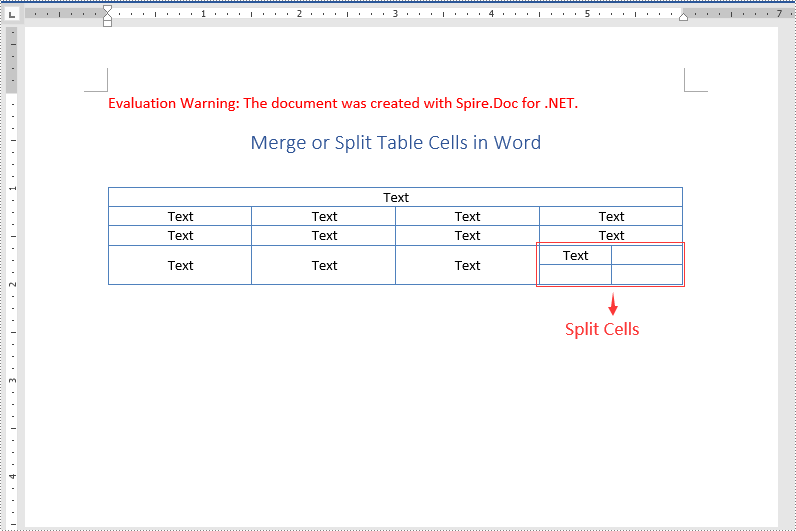
In Microsoft Word, you can merge two or more adjacent cells horizontally or vertically into a larger cell. In Spire.Doc, you can achieve the same using the Table.ApplyHorizontalMerge() or Table.ApplyVerticalMerge() method. The following are the detailed steps:
- Initialize an instance of the Document class.
- Load a Word document using Document.LoadFromFile() method.
- Get a specific section in the document by its index through Document.Sections[int] property.
- Add a table to the section using Section.AddTable() method.
- Specify the number of rows and columns of the table using Table.ResetCells() method.
- Horizontally merge specific cells in the table using Table.ApplyHorizontalMerge() method.
- Vertically merge specific cells in the table using Table.ApplyVerticalMerge() method.
- Add some data to the table.
- Apply a style to the table.
- Save the result document using Document.SaveToFile() method.
- C#
- VB.NET
using Spire.Doc;
using Spire.Doc.Documents;

namespace MergeTableCells
{
    class Program
    {
        static void Main(string[] args)
        {
            //Create a Document instance
            Document document = new Document();
            //Load a Word document
            document.LoadFromFile("Input.docx");

            //Get the first section
            Section section = document.Sections[0];

            //Add a 4 x 4 table to the section
            Table table = section.AddTable();
            table.ResetCells(4, 4);

            //Horizontally merge cells 1, 2, 3, and 4 in the first row
            table.ApplyHorizontalMerge(0, 0, 3);
            //Vertically merge cells 3 and 4 in the first column
            table.ApplyVerticalMerge(0, 2, 3);

            //Add some data to the table
            for (int row = 0; row < table.Rows.Count; row++)
            {
                for (int col = 0; col < table.Rows[row].Cells.Count; col++)
                {
                    TableCell cell = table[row, col];
                    cell.CellFormat.VerticalAlignment = VerticalAlignment.Middle;
                    Paragraph paragraph = cell.AddParagraph();
                    paragraph.Format.HorizontalAlignment = HorizontalAlignment.Center;
                    paragraph.Text = "Text";
                }
            }

            //Apply a style to the table
            table.ApplyStyle(DefaultTableStyle.LightGridAccent1);

            //Save the result document
            document.SaveToFile("MergeCells.docx", FileFormat.Docx2013);
        }
    }
}
Split Table Cells in Word Using C# and VB.NET
Spire.Doc for .NET offers the TableCell.SplitCell() method that enables you to split a cell in a Word table into two or more cells. The following are the detailed steps:
- Initialize an instance of the Document class.
- Load a Word document using Document.LoadFromFile() method.
- Get a specific section in the document by its index through Document.Sections[int] property.
- Get a specific table in the section by its index through Section.Tables[int] property.
- Get the table cell that you want to split through Table.Rows[int].Cells[int] property.
- Split the cell into specific number of columns and rows using TableCell.SplitCell() method.
- Save the result document using Document.SaveToFile() method.
- C#
- VB.NET
using Spire.Doc;

namespace SplitTableCells
{
    class Program
    {
        static void Main(string[] args)
        {
            //Create a Document instance
            Document document = new Document();
            //Load a Word Document
            document.LoadFromFile("MergeCells.docx");

            //Get the first section
            Section section = document.Sections[0];

            //Get the first table in the section
            Table table = section.Tables[0] as Table;

            //Get the 4th cell in the 4th row
            TableCell cell1 = table.Rows[3].Cells[3];
            //Split the cell into 2 columns and 2 rows
            cell1.SplitCell(2, 2);

            //save the result document
            document.SaveToFile("SplitCells.docx", FileFormat.Docx2013);
        }
    }
}
Apply for a Temporary License
If you'd like to remove the evaluation message from the generated documents, or to get rid of the function limitations, please request a 30-day trial license for yourself.
C#: Remove Tables in Word
Tables in Word documents allow users to organize data in a structured, readable format. However, at times you may find that some tables are outdated or no longer serve their intended purpose, making it necessary to remove them. In this article, you will learn how to remove tables from a Word document in C# using Spire.Doc for .NET.
Install Spire.Doc for .NET
To begin with, you need to add the DLL files included in the Spire.Doc for.NET package as references in your .NET project. The DLL files can be either downloaded from this link or installed via NuGet.
PM> Install-Package Spire.Doc
Remove a Specified Table in Word in C#
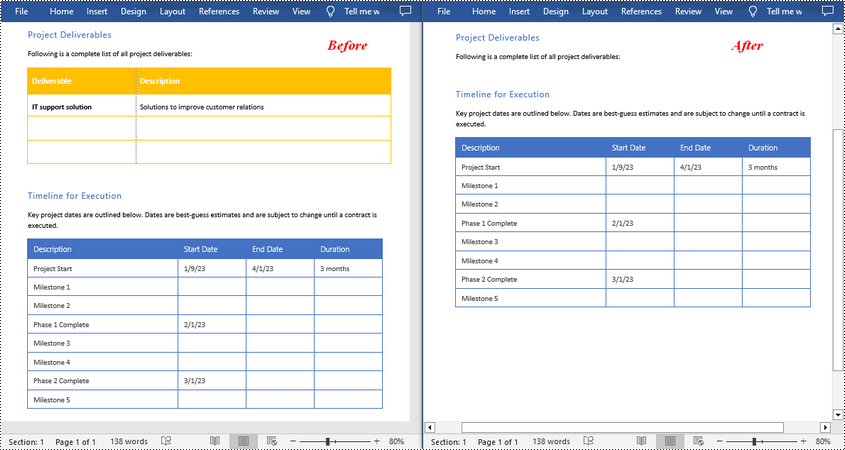
Spire.Doc for .NET provides the Section.Tables.RemoveAt(int index) method to delete a specified table in a Word document by index. The following are the detailed steps.
- Create a Document instance.
- Load a Word document using Document.LoadFromFile() method.
- Get a specified section using Document.Sections[] property.
- Delete a specified table by index using Section.Tables.RemoveAt() method.
- Save the result document using Document.SaveToFile() method.
- C#
using Spire.Doc;

namespace RemoveTable
{
    class Program
    {
        static void Main(string[] args)
        {
            //Create a Document instance
            Document doc = new Document();

            //Load a Word document
            doc.LoadFromFile("tables.docx");

            //Get the first section in the document
            Section sec = doc.Sections[0];

            //Remove the first table in the section
            sec.Tables.RemoveAt(0);

            //Save the result document
            doc.SaveToFile("RemoveATable.docx", FileFormat.Docx);
        }
    }
}
Remove All Tables in Word in C#
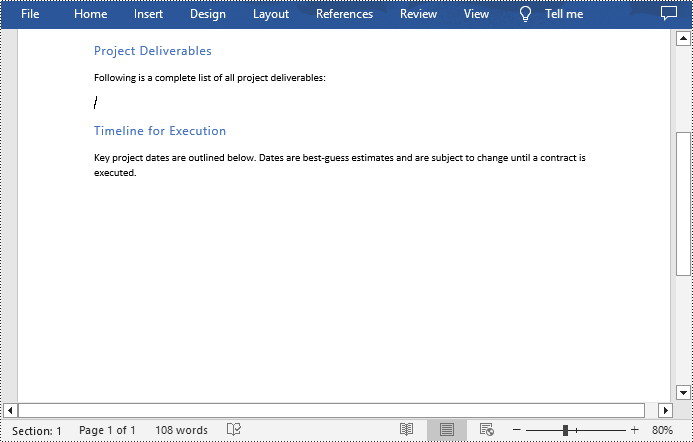
To delete all tables from a Word document, you need to iterate through all sections in the document, then iterate through all tables in each section and remove them through the Section.Tables.Remove() method. The following are the detailed steps.
- Create a Document instance.
- Load a Word document using Document.LoadFromFile() method.
- Iterate through all sections in the document.
- Iterate through all tables in each section.
- Delete the tables using Section.Tables.Remove() method.
- Save the result document using Document.SaveToFile() method.
- C#
using Spire.Doc;

namespace RemoveAllTable
{
    class Program
    {
        static void Main(string[] args)
        {
            //Create a Document instance
            Document doc = new Document();

            //Load a Word document
            doc.LoadFromFile("tables.docx");

            //Iterate through all sections in the document
            foreach (Section section in doc.Sections)
            {
                //Iterate through all tables in each section
                foreach (Table table in section.Tables)
                {
                    //Remove the tables
                    section.Tables.Remove(table);
                }
            }

            //Save the result document
            doc.SaveToFile("RemoveTables.docx", FileFormat.Docx);
        }
    }
}
Apply for a Temporary License
If you'd like to remove the evaluation message from the generated documents, or to get rid of the function limitations, please request a 30-day trial license for yourself.
How to Set Word Table Style in C#, VB.NET
Table in Microsoft Word is used to present data information which can assist to explain specified paragraph contents. In order to have a better appearance, people can set Word table style. This guide shows how to use Spire.Doc to set table style in Word with C#/VB.NET.
Download Spire.Doc (or Spire.Office) with .NET Framework 2.0 (or above) together. Once make sure Spire.Doc (or Spire.Office) are correctly installed on system, follow the steps below to set Word table style
In this example, a Word document with table has been prepared. It is a student transcript template from Office.com.
Step 1: Create a C#/VB.NET project in Visual Studio. Add Spire.Doc.dll as reference.
Document document = new Document();
document.LoadFromFile(@"E:\work\Documents\Student Transcript.docx");
Dim document As New Document()
document.LoadFromFile("E:\work\Documents\Student Transcript.docx")
Step 2: Set Table Style
Get table which you want to set style
Because table1 type is different from document.Sections[0].Tables[1] type, so use (Table) to transformed forcibly.
Table table1 = (Table)document.Sections[0].Tables[1];
Dim table1 As Table = CType(document.Sections(0).Tables(1), Table)
Set table row height.
table1.Rows[0].Height = 25;
table1.Rows(0).Height = 25
Set Table Style
In order to have distinction. Keep the first cell in first row as before and set style for the second cell. Firstly, set alignment and background color for the second cell. Secondly, declare a paragraph style, including font size, color and apply this style in cell.
table1.Rows[0].Cells[1].CellFormat.VerticalAlignment = VerticalAlignment.Middle;
table1.Rows[0].Cells[1].CellFormat.BackColor = Color.LimeGreen;

ParagraphStyle style = new ParagraphStyle(document);
style.Name = "TableStyle";
style.CharacterFormat.FontSize = 14;
style.CharacterFormat.TextColor = Color.GhostWhite;
document.Styles.Add(style);
table1.Rows[0].Cells[1].Paragraphs[0].ApplyStyle(style.Name);
table1.Rows(0).Cells(1).CellFormat.VerticalAlignment = VerticalAlignment.Middle
table1.Rows(0).Cells(1).CellFormat.BackColor = Color.LimeGreen

Dim style As New ParagraphStyle(document)
style.Name = "TableStyle"
style.CharacterFormat.FontSize = 14
style.CharacterFormat.TextColor = Color.GhostWhite
document.Styles.Add(style)
table1.Rows(0).Cells(1).Paragraphs(0).ApplyStyle(style.Name)
Step 3: Save and Launch
document.SaveToFile("WordTable.docx", FileFormat.Docx);
System.Diagnostics.Process.Start("WordTable.docx");
document.SaveToFile("WordTable.docx", FileFormat.Docx)
System.Diagnostics.Process.Start("WordTable.docx")
Effective Screenshot:

This guide shows how to set Word table style such as size and color via Spire.Doc. However, Spire.Doc can do a lot on operating Word document Click to learn more