Spire.XLS for WPF Quick Start
This article is designed to give you a detailed description about how to write a "HelloWorld" demo of Spire.XLS for WPF by Visual Studio. You can follow the below procedure step by step to finish this task. But first of all, please make sure that Spire.XLS for WPF and Visual Studio 2010 are correctly installed on system.
Step 1. Create a new project.
1. Create a new project by choosing WPF Application in Visual Studio and name the project "HelloWorld". If you want to create a C# project, select Visual C#, WPF Application, if you want to build a Visual Basic project, please choose Visual Basic, WPF Application. The detail process is:
Click File → New → Project → WPF Application → Name → OK
2. Set the Target framework property of the HelloWorld project in Solution Explorer to be .NET Framework 4.The process is:
Click Solution Explorer-> HelloWorld (The project that you already built) -> Properties (right click HelloWorld)->Target framework->.NET Framework 4
3. Add a button in MainWindow. The default button name is "button1". You can set button1 Content property to be "Run" in its properties by right clicking it. Thus, it shows "Run" in the MainWindow. You can perform as below:
Click View → Toolbox → Button → Properties (right click button1) → Content → set the Content to be "Run"
Step 2. Add reference and project namespaces.
1. Add Spire.XLS. Wpf.dll as reference in Project. The Default location of Spire.Doc for WPF is “C:\Program Files\e-iceblue\Spire.XLS for WPF”. Details are:
Click Project → Add Reference → Browse → Choose the folder contains Spire.XLS for WPF → Bin → WPF 4.0 → Spire.XLS.Wpf.dll
2. Double click the "Run" button, you can see the following method has been added automatically:
namespace HelloWorld
{
    ///
    /// Interaction logic for MainWindow.xaml
    ///
    public partial class MainWindow : Window
    {
        public MainWindow()
        {
            InitializeComponent();
        }

        private void button1_Click(object sender, RoutedEventArgs e)
        {
        }
    }
}
Namespace HelloWorld
	'''
	''' Interaction logic for MainWindow.xaml
	'''
	Public Partial Class MainWindow
		Inherits Window
		Public Sub New()
			InitializeComponent()
		End Sub

		Private Sub button1_Click(sender As Object, e As RoutedEventArgs)
                           End Sub
	 End Class
End Namespace
3. Add the below namespaces at the top of the method.
using Spire.Xls;
Imports Spire.Xls
Step 3. Write "Hello, World!" in the method.
Add the following code to the method button1_click
           //create a new excel workbook
            Workbook workbook = new Workbook();

            //edit the first worksheet of the workbook
            Worksheet sheet = workbook.Worksheets[0];
            sheet.Range["A1"].Text = "Hello, World!";

            //save the workbook
            workbook.SaveToFile(@"..\..\sample.xls", ExcelVersion.Version97to2003);

            //launch the workbook
            System.Diagnostics.Process.Start(@"..\..\sample.xls");
	  'create a new excel workbook
	   Dim workbook As New Workbook()

	  'edit the first worksheet of the workbook
	   Dim sheet As Worksheet = workbook.Worksheets(0)
	   sheet.Range("A1").Text = "Hello, World!"

	   'save the workbook
	    workbook.SaveToFile("..\..\sample.xls", ExcelVersion.Version97to2003)

	   'launch the workbook
	    System.Diagnostics.Process.Start("..\..\sample.xls")
Step 4. Debug the project
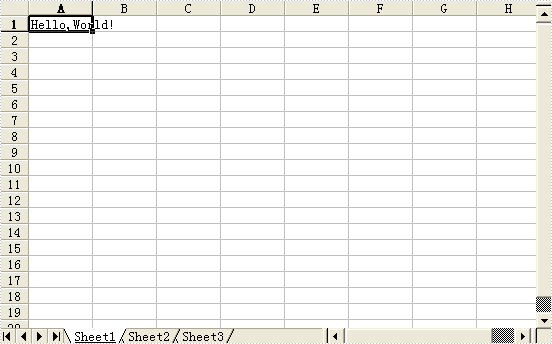
Right click the project HelloWorld in Solution Explorer → Debug → Start new instance → Click Run in MainWindow, an Excel Document will be created, edited and opened. The string "Hello, World!" is drawn in the first cell A1 of sheet 1.
Preview

Spire.XLS for .NET Quick Start
In this document, we will quickly help you finish a simple demo about Spire.XLS using Visual Studio. As usual, it’s a HelloWorld demo. Before you get started, please make sure the Spire.XLS and Visual Studio (2008 or later) are installed on your computer.
1. In Visual Studio, click File, New, and then Project, If you want to create a C# project, select Visual C#, Windows and choose Windows Forms Application and name the project HelloWorld. Click OK. If you want to create a Visual Basic project, select Visual Basic, Windows Forms Application and name the project HelloWorld. Click OK.
2. In Solution Explorer, right-click the project HelloWorld and click Add Reference. In the Browse tab, find the folder in which you installed the Spire.XLS, default is "C:\Program Files\e-iceblue\Spire.XLS", double-click the folder Bin. If the target framework of the project HelloWorld
- is .NET 2.0, double-click folder NET2.0
- is .NET 3.5, double-click folder NET3.5
- is .NET 4.0, double-click folder NET4.0
select assembly Spire.XLS.dll and click OK to add it to the project.
3. In Solution Explorer, double-click the file Form1.cs/Form1.vb to open the form design view, add a button into the form, and change its name to 'btnRun', change its text to 'Run'.
4. Double-click the button 'Run', you will see the code view and the following method has been added automatically:
private void btnRun_Click(object sender, EventArgs e)
Private Sub btnRun_Click(ByVal sender As System.Object, ByVal e As System.EventArgs) Handles btnRun.Click
5. Add the following codes to the top of the file
using Spire.Xls;
Imports Spire.Xls
6. Add the following codes to the method btnRun_Click
//Creates workbook
Workbook workbook = new Workbook();

//Gets first worksheet
Worksheet sheet = workbook.Worksheets[0];

//Writes hello world to A1
sheet.Range["A1"].Text = "Hello,World!";

//Save workbook to disk
workbook.SaveToFile("Sample.xls");

try
{
System.Diagnostics.Process.Start(workbook.FileName);
}
catch { }
'Creates workbook
Dim workbook As Workbook = New Workbook()

'Gets first worksheet
Dim sheet As Worksheet = workbook.Worksheets(0)

'Writes hello world to A1
sheet.Range("A1").Text = "Hello,World!"

'Save workbook to disk
workbook.SaveToFile("Sample.xls")

Try
System.Diagnostics.Process.Start(workbook.FileName)
Catch
End Try
7. In Solution Explorer, right-click the project HelloWorld and click Debug, then Start new instance, you will see the opened window Form1, click the button 'Run', an Excel document will be created, edited and opened. The string "Hello, World" is filled in the cell A1.
