
Cells (28)
Copy Formatting from One Cell or Range to Another in C#, VB.NET
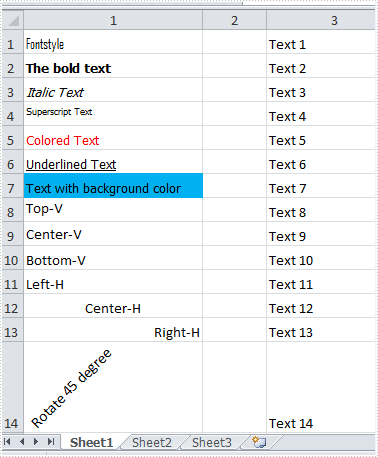
2014-08-28 06:30:47 Written by support iceblueWhen we are dealing with Excel spreadsheets, we may get a cell or a range of cells formatted, then we can use the Format Painter to quickly copy formatting from one place and apply it to another. It saves us much time to do so if we want to format a cell or cells with the previous cell formatting. In this article, I'll introduce you how to copy formatting from a range of cells to another using Spire.XLS.
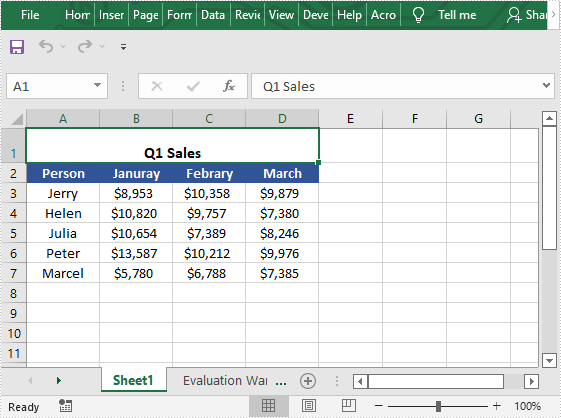
As is shown in the screenshot of test file, contents in the first column have been formatted with different styles, what we want is to correspondingly apply cell formatting from column 1 to column 3.
Code snippets:
Step 1: Create a new instance of Wordbook class and load the test file from disk.
       Workbook workbook = new Workbook();
       workbook.LoadFromFile("Test.xlsx");
Step 2: Get the worksheet from workbook.
Worksheet sheet = workbook.Worksheets[0];
Step 3: Copy the cell formatting from column 1 and apply to cells of column 3.
       int count = sheet.Rows.Count();
       for (int i = 1; i < count + 1; i++)
       {
           sheet.Range[string.Format("C{0}", i)].Style = sheet.Range[string.Format("A{0}", i)].Style;
        }
Step 4: Save to a new Excel file.
workbook.SaveToFile("Result.xlsx", ExcelVersion.Version2010);
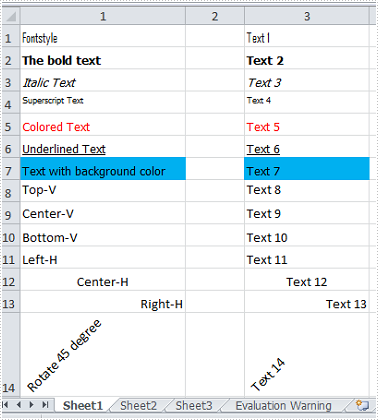
Result:
Full Code:
           static void Main(string[] args)
        {
            Workbook workbook = new Workbook();
            workbook.LoadFromFile("Test.xlsx");
            Worksheet sheet = workbook.Worksheets[0];
            int count = sheet.Rows.Count();
            for (int i = 1; i < count + 1; i++)
            {
                sheet.Range[string.Format("C{0}", i)].Style = sheet.Range[string.Format("A{0}", i)].Style;
            }
            workbook.SaveToFile("Result.xlsx", ExcelVersion.Version2010);
        }
       Private Shared Sub Main(args As String())
	Dim workbook As New Workbook()
	workbook.LoadFromFile("Test.xlsx")
	Dim sheet As Worksheet = workbook.Worksheets(0)
	Dim count As Integer = sheet.Rows.Count()
	For i As Integer = 1 To count
		sheet.Range(String.Format("C{0}", i)).Style = sheet.Range(String.Format("A{0}", i)).Style
	Next
	workbook.SaveToFile("Result.xlsx", ExcelVersion.Version2010)
       End Sub
Excel Freeze Panes keeps rows and columns visible while the rest of the worksheet scrolls. Likewise, we need to unfreeze Excel panes due to work needs in some cases. This article aims at introducing the solution to unfreeze the Excel top row in c# and VB.NET through a utility Excel .NET library Spire.XLS.
First we need to complete the preparatory work:
- Download the latest Spire.XLS and install it on your machine.
- Add the Spire.XLS.dll files as reference.
- Open bin folder and select the three dll files under .NET 4.0.
- Right click property and select properties in its menu.
- Set the target framework as .NET 4.
- Add Spire.XLS as namespace.
Here comes to the explanation of the C# code:
Step 1: Create an instance of Spire.XLS.Workbook.
Workbook workbook = new Workbook();
Step 2: Load the file base on a specified file path.
workbook.LoadFromFile("sample.xls");
Step 3: Get the first worksheet.
Worksheet sheet = workbook.Worksheets[0];
Step 4: Unfreeze the top row.
sheet.RemovePanes();
Step 5: Save as the generated file.
workbook.SaveToFile("sample.xls",ExcelVersion.Version97to2003);
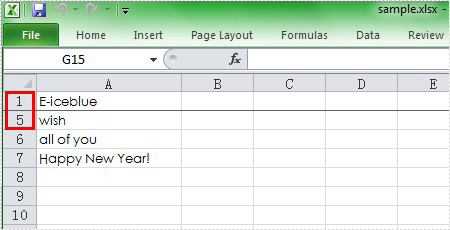
Please preview the freeze panes effect screenshot:
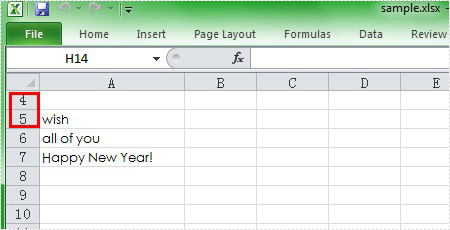
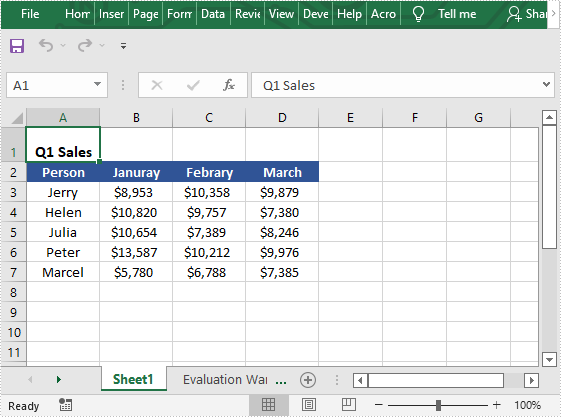
And the unfreeze panes effect screenshot:
Here is the full code in C# and VB.NET:
using Spire.Xls;
namespace UnfreezeExcelPane
{
    class Program
    {

        static void Main(string[] args)
        {
            Workbook workbook = new Workbook();
            workbook.LoadFromFile("Sample.xls");
            Worksheet sheet = workbook.Worksheets[0];
            sheet.RemovePanes();
            workbook.SaveToFile("sample.xls", ExcelVersion.Version97to2003);

        }
    }
}
Imports Spire.Xls
Namespace UnfreezeExcelPane
	Class Program

		Private Shared Sub Main(args As String())
			Dim workbook As New Workbook()
			workbook.LoadFromFile("Sample.xls")
			Dim sheet As Worksheet = workbook.Worksheets(0)
			sheet.RemovePanes()
			workbook.SaveToFile("sample.xls", ExcelVersion.Version97to2003)

		End Sub
	End Class
End Namespace
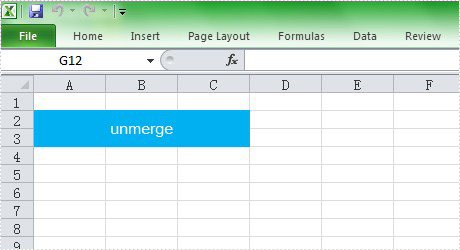
Unmerging and merging Excel cells are indispensable for handling Excel worksheet. This article aims at introducing the solution to unmerge Excel cells in c# through several lines of code. We need an Excel .NET component called Spire.XLS to help us complete the process.
First we need to complete the preparatory work before unmerge Excel cells in C#:
- Download the Spire.XLS and install it on your machine.
- Add the Spire.XLS.dll files as reference.
- Open bin folder and select the three dll files under .NET 4.0.
- Right click property and select properties in its menu.
- Set the target framework as .NET 4.
- Add Spire.XLS as namespace.
Here comes to the explanation of the code:
Step 1: Create an instance of Spire.XLS.Workbook.
Workbook book = new Workbook();
Step 2: Load the file base on a specified file path.
book.LoadFromFile(@"..\..\abc.xlsx");
Step 3: Get the first worksheet.
Worksheet sheet = book.Worksheets[0];
Step 4: Unmerge the cells.
sheet.Range["A2"].UnMerge();
Step5: Save as the generated file.
book.SaveToFile(@"..\..\result.xlsx", ExcelVersion.Version2010);
Here is the whole code:
using Spire.Xls;
namespace UnmergeExcelCell
{
    class Program
    {

        static void Main(string[] args)
        {
            Workbook book = new Workbook();
            book.LoadFromFile(@"..\..\abc.xlsx");
            Worksheet sheet = book.Worksheets[0];
            sheet.Range["A2"].UnMerge();
            book.SaveToFile(@"..\..\result.xlsx", ExcelVersion.Version2010);
        }

    }
}
Please preview the original effect screenshot:
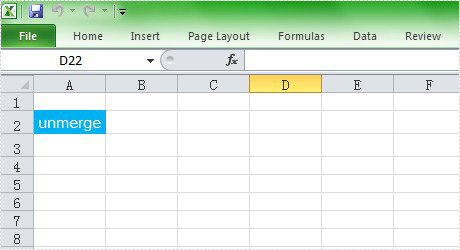
And the generated effect screenshot:
When the data in specific rows or columns are no longer needed, you can delete those rows or columns from your worksheet. In this article, you will learn how to delete rows and columns from Excel in C# and VB.NET using Spire.XLS for .NET library.
Install Spire.XLS for.NET
To begin with, you need to add the DLL files included in the Spire.XLS for.NET package as references in your .NET project. The DLLs files can be either downloaded from this link or installed via NuGet.
PM> Install-Package Spire.XLS
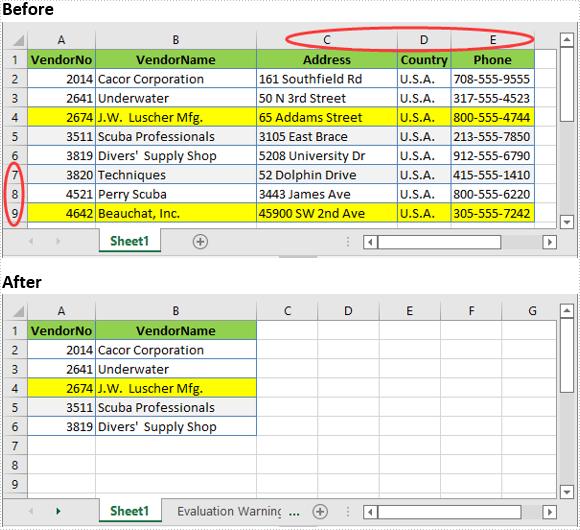
Delete a Specific Row and Column from Excel in C# and VB.NET
The following are the steps to delete a specific row and column from an Excel worksheet:
- Create a Workbook instance.
- Load an Excel file using Workbook.LoadFromFile() method.
- Get the desired worksheet using Workbook.Worksheets[sheetIndex] property.
- Delete the desired row from the worksheet by its index (1-based) using Worksheet.DeleteRow(rowIndex) method.
- Delete the desired column from the worksheet by its index (1-based) using Worksheet.DeleteColumn(columnIndex) method.
- Save the result file using Workbook.SaveToFile() method.
- C#
- VB.NET
using Spire.Xls;

namespace DeleteRowAndColumn
{
    class Program
    {
        static void Main(string[] args)
        {
            //Create a Workbook instance
            Workbook workbook = new Workbook();
            //Load an Excel file
            workbook.LoadFromFile("Sample.xlsx");

            //Get the first worksheet
            Worksheet sheet = workbook.Worksheets[0];
            //Delete the 9th row
            sheet.DeleteRow(9);
            //Delete the 3rd column
            sheet.DeleteColumn(3);

            //Save the result file
            workbook.SaveToFile("DeleteRowAndColumn.xlsx", ExcelVersion.Version2016);
        }
    }
}

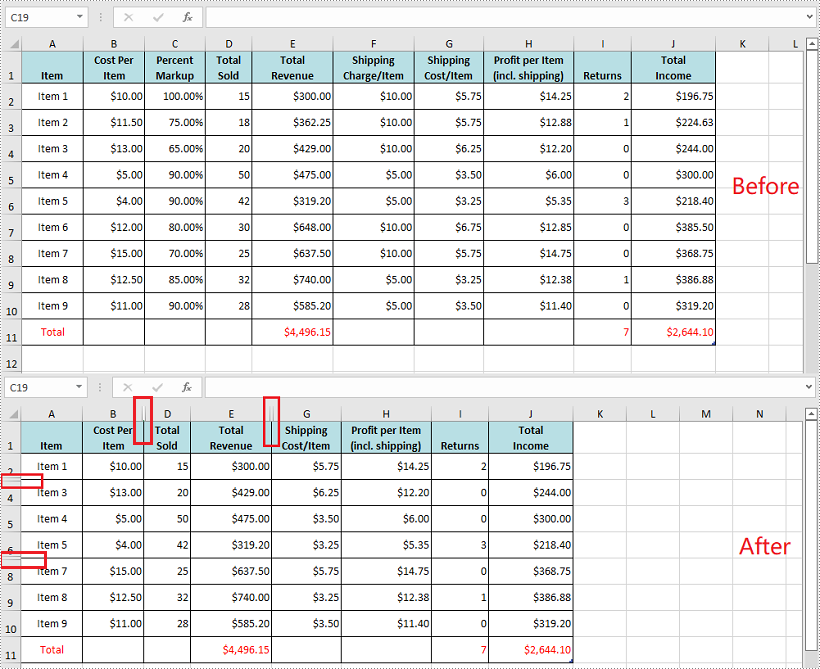
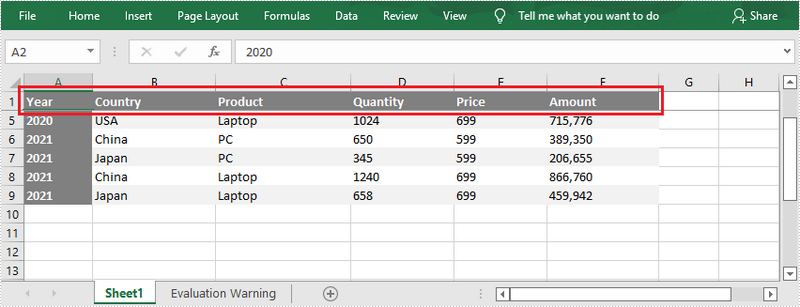
Delete Multiple Rows and Columns from Excel in C# and VB.NET
The following are the steps to delete multiple rows and columns from an Excel worksheet:
- Create a Workbook instance.
- Load an Excel file using Workbook.LoadFromFile() method.
- Get the desired worksheet using Workbook.Worksheets[sheetIndex] property.
- Delete the desired rows from the worksheet using Worksheet.DeleteRow(startRowIndex, rowCount) method.
- Delete the desired columns from the worksheet using Worksheet.DeleteColumn(startColumnIndex, columnCount) method.
- Save the result file using Workbook.SaveToFile() method.
- C#
- VB.NET
using Spire.Xls;

namespace DeleteMultipleRowsAndColumns
{
    class Program
    {
        static void Main(string[] args)
        {
            //Create a Workbook instance
            Workbook workbook = new Workbook();
            //Load an Excel file
            workbook.LoadFromFile(@"Sample.xlsx");

            //Get the first worksheet
            Worksheet sheet = workbook.Worksheets[0];
            //Delete 3 rows from the worksheet starting from the 7th row
            sheet.DeleteRow(7, 3);
            //Delete 3 columns from the worksheet starting from the 3rd column
            sheet.DeleteColumn(3, 3);

            //Save the result file
            workbook.SaveToFile("DeleteMultipleRowsAndColumns.xlsx", ExcelVersion.Version2016);
        }
    }
}
Apply for a Temporary License
If you'd like to remove the evaluation message from the generated documents, or to get rid of the function limitations, please request a 30-day trial license for yourself.
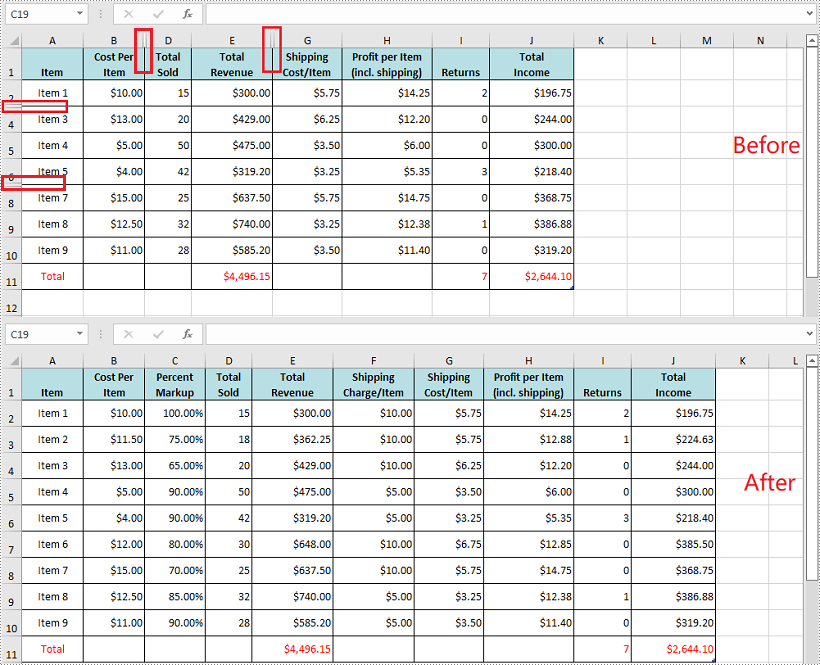
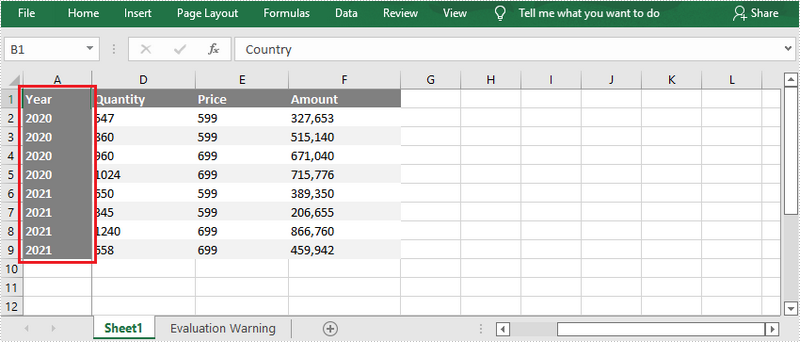
When dealing with Excel files containing large amounts of data, you may sometimes need to hide certain rows and columns to conceal useless data so that you can focus on the information you need to analyze. In this article, you will learn how to hide or show rows and columns in Excel in C# and VB.NET using Spire.XLS for .NET.
- Hide Specific Rows and Columns in Excel
- Show Specific Hidden Rows and Columns in Excel
- Hide Multiple Rows and Columns at Once in Excel
- Show All Hidden Rows and Columns in Excel
Install Spire.XLS for .NET
To begin with, you need to add the DLL files included in the Spire.XLS for .NET package as references in your .NET project. The DLL files can be either downloaded from this link or installed via NuGet.
PM> Install-Package Spire.XLS
Hide Specific Rows and Columns in Excel in C# and VB.NET
The following steps demonstrate how to hide specific rows and columns in Excel in C# and VB.NET:
- Initialize an instance of the Workbook class.
- Load an Excel file using Workbook.LoadFromFile() method.
- Get a specific worksheet through Workbook.Worksheets[int sheetIndex] property.
- Hide specific rows in the worksheet using Worksheet.HideRow(int rowIndex) method.
- Hide Specific columns in the worksheet using Worksheet.HideColumn(int columnIndex) method.
- Save the result file using Workbook.SaveToFile() method.
- C#
- VB.NET
using Spire.Xls;

namespace HideExcelRowsAndColumns
{
    class Program
    {
        static void Main(string[] args)
        {
            //Create a Workbook instance
            Workbook workbook = new Workbook();
            //Load an Excel file
            workbook.LoadFromFile("Input.xlsx");

            //Get the first worksheet
            Worksheet sheet = workbook.Worksheets[0];

            //Hide the 3rd and the 7th rows
            sheet.HideRow(3);
            sheet.HideRow(7);

            //Hide the 3rd and the 6th columns
            sheet.HideColumn(3);
            sheet.HideColumn(6);

            //Save the result file
            workbook.SaveToFile("HideRowsAndColumns.xlsx", ExcelVersion.Version2013);
        }
    }
}
Show Specific Hidden Rows and Columns in Excel in C# and VB.NET
The following steps demonstrate how to show specific hidden rows and columns in Excel in C# and VB.NET:
- Initialize an instance of the Workbook class.
- Load an Excel file using Workbook.LoadFromFile() method.
- Get a specific worksheet through Workbook.Worksheets[int sheetIndex] property.
- Show specific hidden rows in the worksheet using Worksheet.ShowRow(int rowIndex) method.
- Show specific hidden columns in the worksheet using Worksheet.ShowColumn(int columnIndex) method.
- Save the result file using Workbook.SaveToFile() method.
- C#
- VB.NET
using Spire.Xls;

namespace ShowExcelRowsAndColumns
{
    class Program
    {
        static void Main(string[] args)
        {
            //Create a Workbook instance
            Workbook workbook = new Workbook();
            //Load an Excel file
            workbook.LoadFromFile("HideRowsAndColumns.xlsx");

            //Get the first worksheet
            Worksheet sheet = workbook.Worksheets[0];

            //Show the 3rd and the 7th rows
            sheet.ShowRow(3);
            sheet.ShowRow(7);

            //Show the 3rd and the 6th columns
            sheet.ShowColumn(3);
            sheet.ShowColumn(6);

            //Save the result file
            workbook.SaveToFile("ShowRowsAndColumns.xlsx", ExcelVersion.Version2013);
        }
    }
}
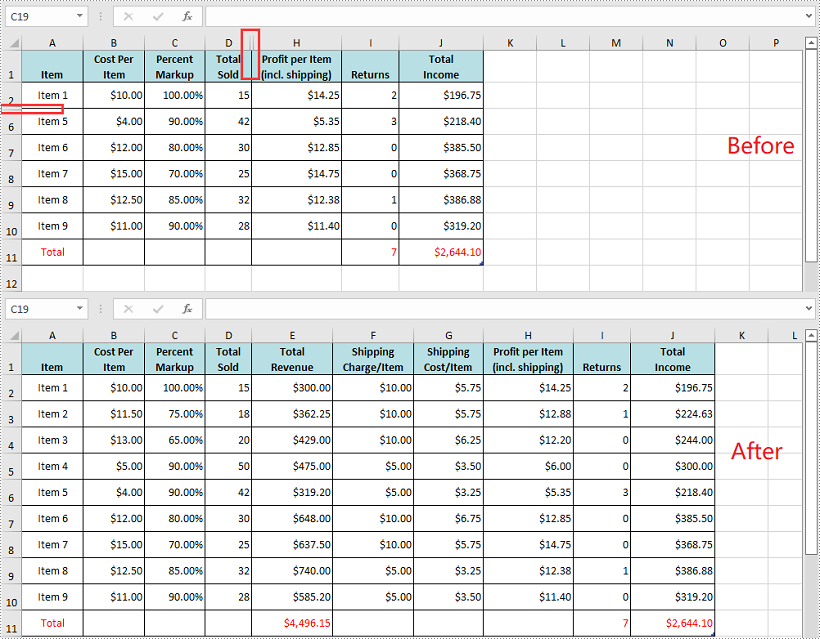
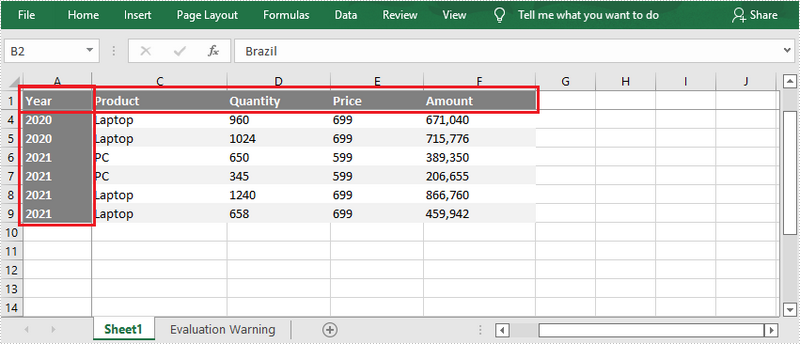
Hide Multiple Rows and Columns at Once in Excel in C# and VB.NET
The following steps demonstrate how to hide multiple rows and columns at once in Excel in C# and VB.NET:
- Initialize an instance of the Workbook class.
- Load an Excel file using Workbook.LoadFromFile() method.
- Get a specific worksheet through Workbook.Worksheets[int sheetIndex] property.
- Hide multiple rows in the worksheet using Worksheet.HideRows(int rowIndex, int rowCount) method.
- Hide multiple columns in the worksheet using Worksheet.HideColumns(int columnIndex, int columnCount) method.
- Save the result file using Workbook.SaveToFile() method.
- C#
- VB.NET
using Spire.Xls;

namespace HideMultipleExcelRowsAndColumns
{
    class Program
    {
        static void Main(string[] args)
        {
            //Create a Workbook instance
            Workbook workbook = new Workbook();
            //Load an Excel file
            workbook.LoadFromFile("Input.xlsx");

            //Get the first worksheet
            Worksheet sheet = workbook.Worksheets[0];

            //Hide 3, 4 and 5 rows
            sheet.HideRows(3, 3);

            //Hide 5, 6 and 7 columns
            sheet.HideColumns(5, 3);

            //Save the result file
            workbook.SaveToFile("HideMultipleRowsAndColumns.xlsx", ExcelVersion.Version2013);
        }
    }
}

Show All Hidden Rows and Columns in Excel in C# and VB.NET
The following steps demonstrate how to show all hidden rows and columns in Excel in C# and VB.NET:
- Initialize an instance of the Workbook class.
- Load an Excel file using Workbook.LoadFromFile() method.
- Get a specific worksheet through Workbook.Worksheets[int sheetIndex] property.
- Iterate through the rows in the worksheet and find the hidden rows using Worksheet.GetRowIsHide(int rowIndex) method.
- Show all hidden rows using Worksheet.ShowRow(int rowIndex) method.
- Iterate through the columns in the worksheet and find the hidden columns using Worksheet.GetColumnIsHide(int columnIndex) method.
- Show all hidden columns using Worksheet.ShowColumn(int columnIndex) method.
- Save the result file using Workbook.SaveToFile() method.
- C#
- VB.NET
using Spire.Xls;

namespace ShowAllHiddenRowsAndColumns
{
    class Program
    {
        static void Main(string[] args)
        {
            //Create a Workbook instance
            Workbook workbook = new Workbook();
            //Load an Excel file
            workbook.LoadFromFile("HideRowsAndColumns.xlsx");

            //Get the first worksheet
            Worksheet sheet = workbook.Worksheets[0];

            //Iterate through the rows in the worksheet
            for (int i = 1; i <= sheet.LastRow; i++)
            {
                //Check if the current row is hidden
                if (sheet.GetRowIsHide(i))
                {
                    //Show the hidden row
                    sheet.ShowRow(i);
                }
            }

            //Iterate through the columns in the worksheet
            for (int j = 1; j <= sheet.LastRow; j++)
            {
                //Check if the current column is hidden
                if (sheet.GetColumnIsHide(j))
                {
                    //Show the hidden column
                    sheet.ShowColumn(j);
                }
            }

            //Save the result file
            workbook.SaveToFile("ShowAllHiddenRowsAndColumns.xlsx", ExcelVersion.Version2013);
        }
    }
}
Apply for a Temporary License
If you'd like to remove the evaluation message from the generated documents, or to get rid of the function limitations, please request a 30-day trial license for yourself.
The purpose of creating dropdown lists in an Excel document is to provide a convenient way for data input, restricting users to select only from predefined options. This helps prevent input errors and ensures data accuracy. With dropdown lists, users can choose from a fixed list of options without the need to manually enter data, thereby reducing the possibility of input errors. This article will introduce how to use Spire.XLS for .NET to create dropdown lists in Excel documents within a C# project.
- Create Dropdown List using String Array in C#
- Create Dropdown List using Data from the Same Worksheet in C#
- Create Dropdown List using Data from Different Worksheets in C#
- Create Linked Dropdown Lists in the Same Worksheet in C#
- Create Linked Dropdown Lists across Different Worksheets in C#
Install Spire.XLS for .NET
To begin with, you need to add the DLL files included in the Spire.XLS for .NET package as references in your .NET project. The DLL files can be either downloaded from this link or installed via NuGet.
PM> Install-Package Spire.XLS
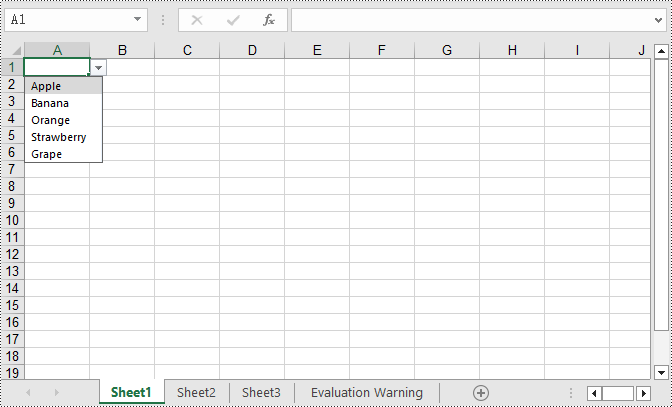
Create Dropdown List using String Array in C#
Using Spire.XLS, you can easily create dropdown lists in cells by assigning a string array to the CellRange.DataValidation.Values property. Here are the detailed steps:
- Create a Workbook object.
- Use Workbook.Worksheets[0] to get the first worksheet in the workbook.
- Create a string array and assign it to the CellRange.DataValidation.Values property.
- Save the document to a specified path using the Workbook.SaveToFile() method.
- C#
using Spire.Xls;

namespace SpireXlsDemo
{
    internal class Program
    {
        static void Main(string[] args)
        {
            // Create a Workbook object
            Workbook workbook = new Workbook();

            // Get the first Worksheet in the Workbook object
            Worksheet worksheet = workbook.Worksheets[0];

            // Create a string array
            string[] values = new string[] { "Apple", "Banana", "Orange", "Strawberry", "Grape" };

            // Set data validation in cell A1 of the worksheet, restricting selectable values to those in the values array
            worksheet.Range["A1"].DataValidation.Values = values;

            // Save the Workbook object as an Excel file
            workbook.SaveToFile("DropdownListCreatedFromArray.xlsx", ExcelVersion.Version2016);

            // Dispose of the resources occupied by the Workbook object
            workbook.Dispose();
        }
    }
}
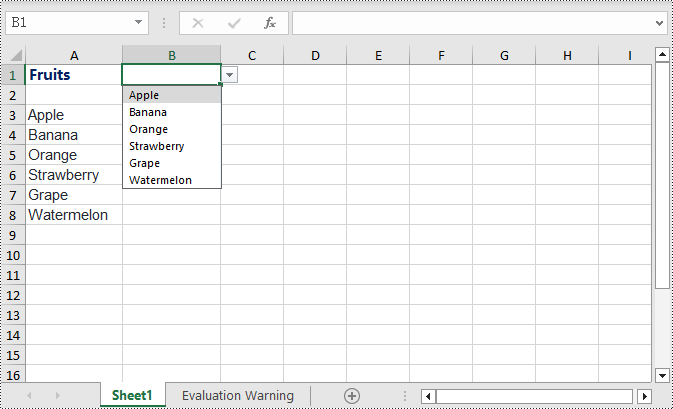
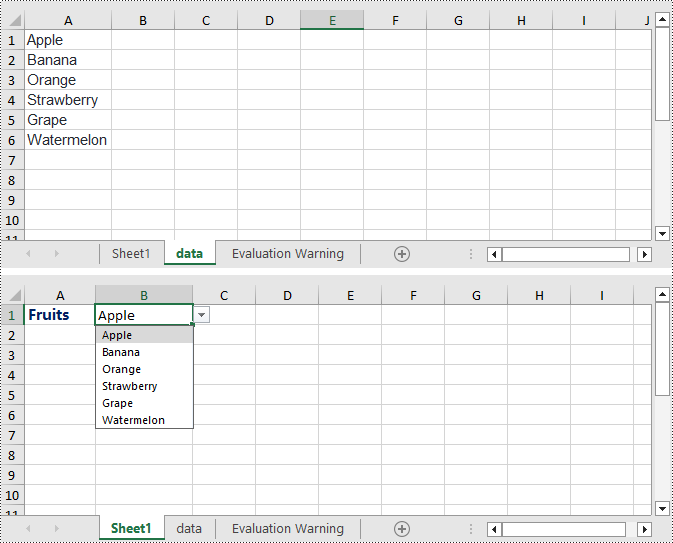
Create Dropdown List using Data from the Same Worksheet in C#
The following example demonstrates creating a dropdown list in the worksheet where the data is located by specifying the data range and applying it to the corresponding cell. Here are the detailed steps:
- Create a Workbook object.
- Load an Excel document using the Workbook.LoadFromFile() method.
- Access the first worksheet in the workbook using Workbook.Worksheets[0].
- Get the data range using Worksheet.Range[""].
- Specify cell B1 as a dropdown list and set the data range using Worksheet.Range["B1"].DataValidation.DataRange.
- Save the document to a specified path using the Workbook.SaveToFile() method.
- C#
using Spire.Xls;

namespace SpireXlsDemo
{
    internal class Program
    {
        static void Main(string[] args)
        {
            // Create a new workbook object
            Workbook workbook = new Workbook();

            // Load workbook data from a file
            workbook.LoadFromFile("Sample1.xlsx");

            // Get the first worksheet in the workbook
            Worksheet worksheet = workbook.Worksheets[0];

            // Get the cell range from A3 to A8 in the worksheet
            CellRange dataRange = worksheet.Range["A3:A8"];

            // Set cell B1 as a dropdown with data range obtained earlier
            worksheet.Range["B1"].DataValidation.DataRange = dataRange;

            // Save the workbook to a new file
            workbook.SaveToFile("CreateDropdownInSameWorksheet.xlsx", ExcelVersion.Version2016);

            // Dispose of the workbook resources
            workbook.Dispose();
        }
    }
}
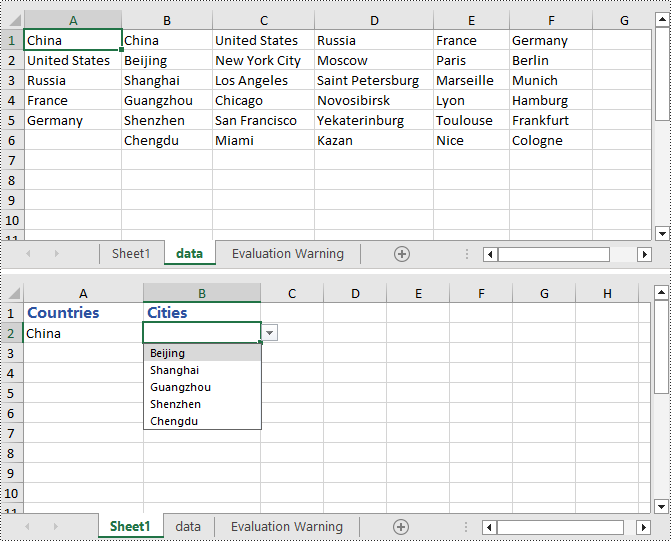
Create Dropdown List using Data from Different Worksheets in C#
This example demonstrates how to specify a data range in one worksheet and apply it to a specific cell in another worksheet. In this process, it is necessary to ensure that Worksheet.ParentWorkbook.Allow3DRangesInDataValidation = true is set to enable the functionality of creating dropdown lists across different worksheets. Here are the detailed steps:
- Create a Workbook object.
- Load an Excel document using the Workbook.LoadFromFile() method.
- Retrieve a specific worksheet from the workbook using Workbook.Worksheets[].
- Set Worksheet.ParentWorkbook.Allow3DRangesInDataValidation = true to enable the use of 3D ranges in data validation within the worksheet.
- Use CellRange.DataValidation.DataRange to specify a cell as a dropdown list and set the data range.
- Save the document to a specified path using the Workbook.SaveToFile() method.
- C#
using Spire.Xls;

namespace SpireXlsDemo
{
    internal class Program
    {
        static void Main(string[] args)
        {
            // Create a Workbook object
            Workbook workbook = new Workbook();

            // Load the workbook from a file
            workbook.LoadFromFile("Sample2.xlsx");

            // Get the first worksheet
            Worksheet worksheet1 = workbook.Worksheets[0];

            // Get the second worksheet
            Worksheet worksheet2 = workbook.Worksheets[1];

            // Allow the use of 3D ranges in data validation
            worksheet1.ParentWorkbook.Allow3DRangesInDataValidation = true;

            // Define the data range
            CellRange dataRange = worksheet2.Range["A1:A6"];

            // Apply the data range to cell B1 in worksheet 1 as data validation
            worksheet1.Range["B1"].DataValidation.DataRange = dataRange;

            // Save the workbook to a file
            workbook.SaveToFile("Create the Dropdowns Across Different Worksheets.xlsx", ExcelVersion.Version2016);

            // Release the resources of the workbook
            workbook.Dispose();
        }
    }
}
Create Linked Dropdown Lists in the Same Worksheet in C#
Linked dropdown menus refer to the automatic updating of options in one dropdown menu based on the selection made in another dropdown menu. This example demonstrates how to create linked dropdown lists (dropdown menus) functionality within the same worksheet. This is achieved by adding an INameRange object and setting the reference range, as well as setting the data range and formula for data validation to achieve the linked dropdown effect. Here are the detailed steps:
- Create a Workbook object.
- Load an Excel document using the Workbook.LoadFromFile() method.
- Retrieve a specific worksheet from the workbook using Workbook.Worksheets[].
- Add an INamedRange object and set the reference range.
- Set Worksheet.ParentWorkbook.Allow3DRangesInDataValidation = true to enable the use of 3D ranges in data validation within the worksheet.
- Use CellRange.DataValidation.DataRange to specify a cell as a dropdown box and set the data range.
- Set CellRange.DataValidation.AllowType = CellDataType.User to specify the data validation type for cells in the worksheet as user-defined.
- Set CellRange.DataValidation.Formula1 = "=INDIRECT(SUBSTITUTE(A2,\" \",\"_\"))", which means that the data validation for this cell will dynamically select the data range based on the value in the cell.
- Save the document to a specified path using the Workbook.SaveToFile() method.
- C#
using Spire.Xls;

namespace SpireXlsDemo
{
    internal class Program
    {
        static void Main(string[] args)
        {
            // Create a new workbook object
            Workbook workbook = new Workbook();

            // Load the workbook from a file
            workbook.LoadFromFile("Sample3.xlsx");

            // Get the first worksheet
            Worksheet worksheet1 = workbook.Worksheets[0];

            // Get the second worksheet
            Worksheet worksheet2 = workbook.Worksheets[1];

            // Add named range objects and set reference ranges
            Spire.Xls.Core.INamedRange namedRange = workbook.NameRanges.Add(worksheet2.Range["A1"].Text);
            namedRange.RefersToRange = worksheet2.Range["B2:B6"];
            namedRange = workbook.NameRanges.Add(worksheet2.Range["A2"].Text.Replace(" ", "_"));
            namedRange.RefersToRange = worksheet2.Range["C2:C6"];
            namedRange = workbook.NameRanges.Add(worksheet2.Range["A3"].Text);
            namedRange.RefersToRange = worksheet2.Range["D2:D6"];
            namedRange = workbook.NameRanges.Add(worksheet2.Range["A4"].Text);
            namedRange.RefersToRange = worksheet2.Range["E2:E6"];
            namedRange = workbook.NameRanges.Add(worksheet2.Range["A5"].Text);
            namedRange.RefersToRange = worksheet2.Range["F2:F6"];

            // Allow 3D ranges in data validation
            worksheet1.ParentWorkbook.Allow3DRangesInDataValidation = true;

            // Set the data range for data validation
            worksheet1.Range["A2"].DataValidation.DataRange = worksheet2.Range["A1:A5"];
            worksheet1.Range["B2"].DataValidation.AllowType = CellDataType.User;

            // Set the formula
            worksheet1.Range["B2"].DataValidation.Formula1 = "=INDIRECT(SUBSTITUTE(A2,\" \",\"_\"))";

            // Save the workbook to a file
            workbook.SaveToFile("Linked Dropdowns in the Same Worksheet.xlsx", ExcelVersion.Version2016);

            // Dispose of the workbook resources
            workbook.Dispose();
        }
    }
}
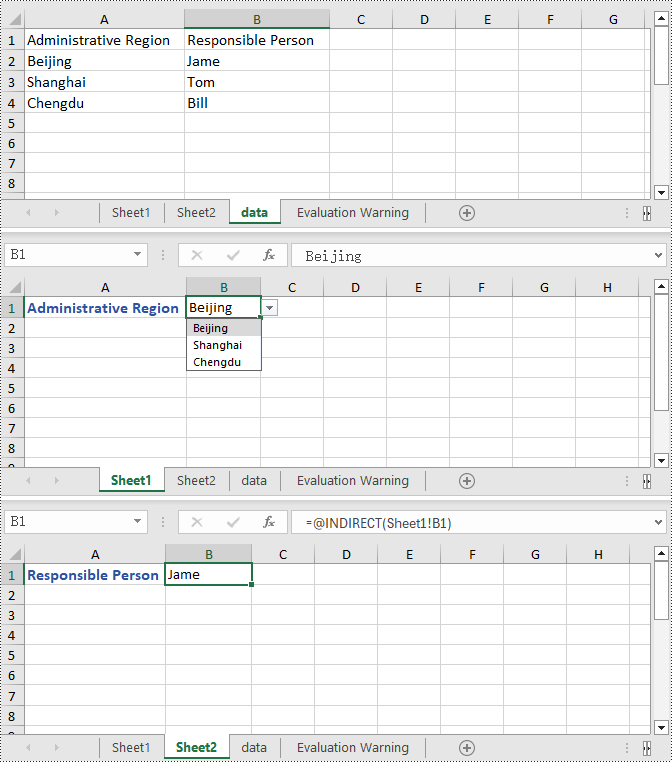
Create Linked Dropdown Lists across Different Worksheets in C#
This example demonstrates how to implement linked dropdown lists between different worksheets in an Excel document. By adding an INameRange object and setting the reference range, you can set the data validation range in the first worksheet and set the cell formula in the second worksheet to achieve the linked dropdown effect. Here are the detailed steps:
- Create a Workbook object.
- Load an Excel document using the Workbook.LoadFromFile() method.
- Retrieve a specific worksheet from the workbook using Workbook.Worksheets[].
- Add an INamedRange object and set the reference range.
- Set Worksheet.ParentWorkbook.Allow3DRangesInDataValidation = true to enable data validation using 3D ranges in the worksheet.
- Set the data validation range using CellRange.DataValidation.DataRange.
- Set the formula in a cell in the second worksheet using CellRange.Formula = "=INDIRECT(" + worksheet1.Name + "!B1)" to indirectly reference the value of a cell in the first worksheet.
- Save the document to a specified path using the Workbook.SaveToFile() method.
- C#
using Spire.Xls;

namespace SpireXlsDemo
{
	internal class Program
	{
		static void Main(string[] args)
		{
                                     // Create a Workbook object
                                     Workbook workbook = new Workbook();

                                     // Load the workbook from a file
                                     workbook.LoadFromFile("Sample4.xlsx");

                                     // Get the first worksheet
                                     Worksheet worksheet1 = workbook.Worksheets[0];

                                     // Get the second worksheet
                                     Worksheet worksheet2 = workbook.Worksheets[1];

                                     // Get the data worksheet
                                     Worksheet dataSheet = workbook.Worksheets[2];

                                     // Add a named range object and set the reference range
                                     Spire.Xls.Core.INamedRange namedRange = workbook.NameRanges.Add(dataSheet.Range["A2"].Text);
                                     namedRange.RefersToRange = dataSheet.Range["B2"];
                                     namedRange = workbook.NameRanges.Add(dataSheet.Range["A3"].Text);
                                     namedRange.RefersToRange = dataSheet.Range["B3"];
                                     namedRange = workbook.NameRanges.Add(dataSheet.Range["A4"].Text);
                                     namedRange.RefersToRange = dataSheet.Range["B4"];

                                     // Allow 3D ranges in data validation
                                     worksheet1.ParentWorkbook.Allow3DRangesInDataValidation = true;

                                     // Set the data range for data validation
                                     worksheet1.Range["B1"].DataValidation.DataRange = dataSheet.Range["A2:A4"];

                                     // Set the formula for cell B1 in the second worksheet
                                     worksheet2.Range["B1"].Formula = "=INDIRECT(" + worksheet1.Name + "!B1)";

                                     // Save the workbook to a file
                                     workbook.SaveToFile("Creating Linked Dropdowns Across Different Worksheets.xlsx", ExcelVersion.Version2016);

                                     // Release the resources of the workbook
                                     workbook.Dispose();
		}
	}
}
Apply for a Temporary License
If you'd like to remove the evaluation message from the generated documents, or to get rid of the function limitations, please request a 30-day trial license for yourself.
Excel Panes can be frozen in order to keep certain rows or columns visible when scrolling through the worksheet. This is particularly helpful when you have a huge amount of data that you need to deal with. In this article, you will learn how to freeze rows or/and columns in C# and VB.NET using Sprie.XLS for .NET.
Spire.XLS provides the Worksheet.FreezePanes(int rowIndex, int columnIndex) method to freeze all rows and columns above and left of the selected cell which is determined by the rowIndex and the columnIndex.

The following sections will demonstrate how to:
Install Spire.XLS for .NET
To begin with, you need to add the DLL files included in the Spire.XLS for .NET package as references in your .NET project. The DLL files can be either downloaded from this link or installed via NuGet.
PM> Install-Package Spire.XLS
Freeze the Top Row
To freeze the top row, the selected cell should be the cell (2, 1) – “A2”. The following are the steps to freeze the top row using Spire.XLS for .NET.
- Create a Workbook object.
- Load an Excel file using Workbook.LoadFromFile() method.
- Get a specific worksheet through Workbook.Worksheets[sheetIndex] property.
- Freeze the top row by passing (2, 1) to the Worksheet.FreezePanes(int rowIndex, int columnIndex) method as the parameter.
- Save the workbook to another Excel file using Workbook.SaveToFile() method.
- C#
- VB.NET
using Spire.Xls;

namespace FreezeTopRow
{
    class Program
    {
        static void Main(string[] args)
        {
            //Create a Workbook instance
            Workbook workbook = new Workbook();

            //Load an Excel document
            workbook.LoadFromFile(@"C:\Users\Administrator\Desktop\sample.xlsx");

            //Get the first worksheet
            Worksheet sheet = workbook.Worksheets[0];

            //Freeze the top row
            sheet.FreezePanes(2, 1);

            //Save to another file
            workbook.SaveToFile("FreezeTopRow.xlsx", ExcelVersion.Version2016);
        }
    }
}
Freeze the First Column
To freeze the first column, the selected cell should be the cell (1, 2) – “B1”. The following are the steps to freeze the first column using Spire.XLS for .NET.
- Create a Workbook object.
- Load an Excel file using Workbook.LoadFromFile() method.
- Get a specific worksheet through Workbook.Worksheets[sheetIndex] property.
- Freeze the top row by passing (1, 2) to the Worksheet.FreezePanes(int rowIndex, int columnIndex) method as the parameter.
- Save the workbook to another Excel file using Workbook.SaveToFile() method.
- C#
- VB.NET
using Spire.Xls;

namespace FreezeFirstColumn
{
    class Program
    {
        static void Main(string[] args)
        {
            //Create a Workbook instance
            Workbook workbook = new Workbook();

            //Load an Excel document
            workbook.LoadFromFile(@"C:\Users\Administrator\Desktop\sample.xlsx");

            //Get the first worksheet
            Worksheet sheet = workbook.Worksheets[0];

            //Freeze the first column
            sheet.FreezePanes(1, 2);

            //Save to another file
            workbook.SaveToFile("FreezeFirstColumn.xlsx", ExcelVersion.Version2016);
        }
    }
}
Freeze the First Row and the First Column
To freeze the first row and the first column, the selected cell should be the cell (2, 2) – “B2”. The following are the detailed steps.
- Create a Workbook object.
- Load an Excel file using Workbook.LoadFromFile() method.
- Get a specific worksheet through Workbook.Worksheets[sheetIndex] property.
- Freeze the first row and the first column by passing (2, 2) to the Worksheet.FreezePanes(int rowIndex, int columnIndex) method as the parameter.
- Save the workbook to another Excel file using Workbook.SaveToFile() method.
- C#
- VB.NET
using Spire.Xls;

namespace FreezeFirstRowAndFirstColumn
{
    class Program
    {
        static void Main(string[] args)
        {
            //Create a Workbook instance
            Workbook workbook = new Workbook();

            //Load an Excel document
            workbook.LoadFromFile(@"C:\Users\Administrator\Desktop\sample.xlsx");

            //Get the first worksheet
            Worksheet sheet = workbook.Worksheets[0];

            //Freeze the first row and the first column
            sheet.FreezePanes(2, 2);

            //Save to another file
            workbook.SaveToFile("FreezeFirstRowAndFirstColumn.xlsx", ExcelVersion.Version2016);
        }
    }
}
Apply for a Temporary License
If you'd like to remove the evaluation message from the generated documents, or to get rid of the function limitations, please request a 30-day trial license for yourself.
When working with Excel spreadsheets, it is common to add additional rows or columns as your data set grows or the scope of your project expands. By inserting rows and columns, you can quickly modify the structure of your spreadsheet to accommodate new information. In this article, you will learn how to insert rows and columns in Excel in C# using Spire.XLS for .NET.
Install Spire.XLS for .NET
To begin with, you need to add the DLL files included in the Spire.XLS for .NET package as references in your .NET project. The DLL files can be either downloaded from this link or installed via NuGet.
PM> Install-Package Spire.XLS
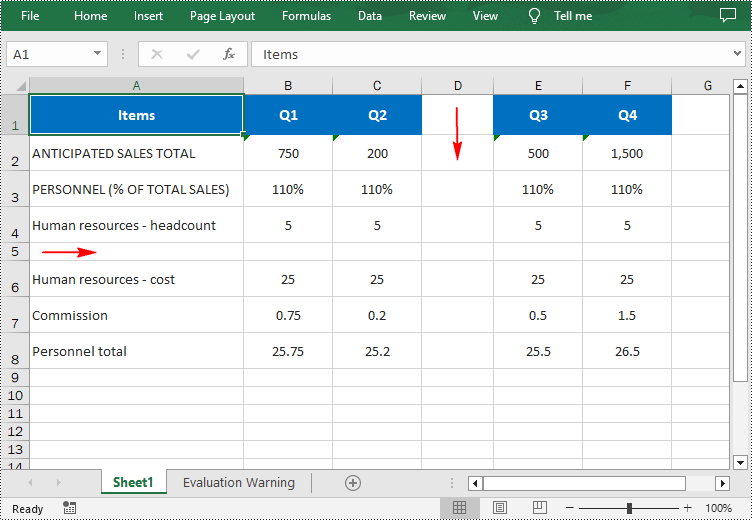
Insert a Row and a Column in Excel in C#
Spire.XLS for .NET provides the Worksheet.InsertRow(int rowIndex) and Worksheet.InsertColumn(int columnIndex) methods for inserting a blank row and a blank column in an Excel worksheet. The following are the detailed steps:
- Create a Workbook instance.
- Load a sample Excel file using Workbook.LoadFromFile() method.
- Get a specified worksheet using Workbook.Worksheets[sheetIndex] property.
- Insert a row into the worksheet using Worksheet.InsertRow(int rowIndex) method.
- Insert a column into the worksheet using Worksheet.InsertColumn(int columnIndex) method.
- Save the result file using Workbook.SaveToFile() method.
- C#
using Spire.Xls;

namespace InsertRowColumn
{
    class Program
    {
        static void Main(string[] args)
        {
            //Create a Workbook instance
            Workbook workbook = new Workbook();

            //Load an Excel document
            workbook.LoadFromFile("input.xlsx");

            //Get a specified worksheet
            Worksheet worksheet = workbook.Worksheets[0];

            //Insert a blank row as the 5th row in the worksheet
            worksheet.InsertRow(5);

            //Insert a blank column as the 4th column in the worksheet
            worksheet.InsertColumn(4);

            //Save the result file
            workbook.SaveToFile("InsertRowAndColumn.xlsx", ExcelVersion.Version2016);
        }
    }
}
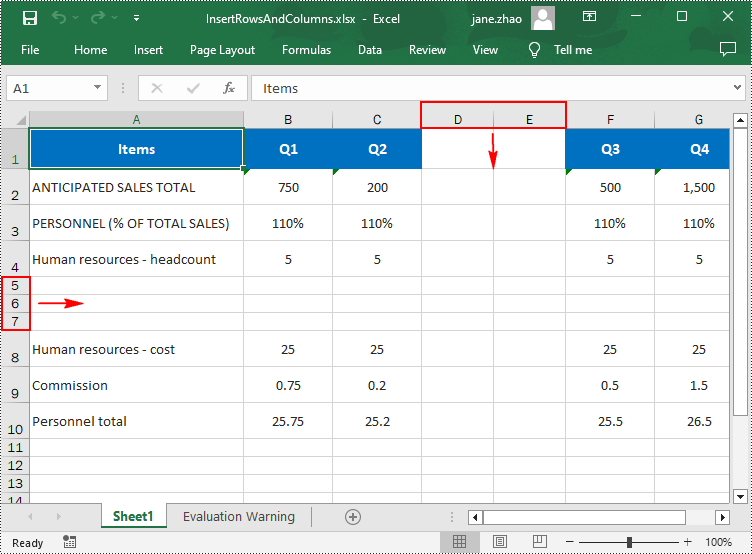
Insert Multiple Rows and Columns in Excel in C#
To insert multiple rows and columns into a worksheet, you can use the Worksheet.InsertRow(int rowIndex, int rowCount) and Worksheet.InsertColumn(int columnIndex, int columnCount) methods. The following are detailed steps.
- Create a Workbook instance.
- Load a sample Excel file using Workbook.LoadFromFile() method.
- Get a specified worksheet using Workbook.Worksheets[sheetIndex] property.
- Insert multiple rows into the worksheet using Worksheet.InsertRow(int rowIndex, int rowCount) method.
- Insert multiple columns into the worksheet using Worksheet.InsertColumn(int columnIndex, int columnCount) method.
- Save the result file using Workbook.SaveToFile() method.
- C#
using Spire.Xls;

namespace InsertRowColumn
{
    class Program
    {
        static void Main(string[] args)
        {
            //Create a Workbook instance
            Workbook workbook = new Workbook();

            //Load an Excel document
            workbook.LoadFromFile(@"E:\PythonExcel\input1.xlsx");

            //Get a specified worksheet
            Worksheet worksheet = workbook.Worksheets[0];

            //Insert three blank rows into the worksheet
            worksheet.InsertRow(5, 3);

            //Insert two blank columns into the worksheet
            worksheet.InsertColumn(4, 2);

            //Save the result file
            workbook.SaveToFile("InsertRowsAndColumns.xlsx", ExcelVersion.Version2016);
        }
    }
}
Apply for a Temporary License
If you'd like to remove the evaluation message from the generated documents, or to get rid of the function limitations, please request a 30-day trial license for yourself.
Merging cells means joining two or more separate cells into one large cell, which is useful when you need to create a label that spans multiple columns. In this article, we will demonstrate how to merge or unmerge cells in Excel in C# and VB.NET using Spire.XLS for .NET library.
Install Spire.XLS for .NET
To begin with, you need to add the DLL files included in the Spire.XLS for .NET package as references in your .NET project. The DLL files can be either downloaded from this link or installed via NuGet.
PM> Install-Package Spire.XLS
Merge Cells in Excel in C# and VB.NET
The following are the steps to merge cells in Excel:
- Create a Workbook instance
- Load the Excel file using Workbook.LoadFromFile() method.
- Get the desired worksheet using Workbook.Worksheets[sheetIndex] property.
- Access the specific range of cells and merge them into one using XlsRange.Merge() method.
- Center the text in the merged cell by setting CellRange.Style.HorizontalAlignment property to HorizontalAlignType.Center.
- Save the result file using Workbook.SaveToFile() method.
- C#
- VB.NET
using Spire.Xls;

namespace MergeCells
{
    class Program
    {
        static void Main(string[] args)
        {
            //Create a Workbook instance
            Workbook workbook = new Workbook();
            //Load the Excel file
            workbook.LoadFromFile("Sample.xlsx");

            //Get the first worksheet
            Worksheet sheet = workbook.Worksheets[0];
            //Merge cells A1-D1 into one cell
            CellRange range = sheet.Range["A1:D1"];
            range.Merge();
            //Center the text in the merged cell
            range.Style.HorizontalAlignment = HorizontalAlignType.Center;

            //Save the result file
            workbook.SaveToFile("MergeCells.xlsx", ExcelVersion.Version2013);
        }
    }
}
Unmerge Cells in Excel in C# and VB.NET
The following are the steps to unmerge cells in Excel:
- Create a Workbook instance
- Load the Excel file using Workbook.LoadFromFile() method.
- Get the desired worksheet using Workbook.Worksheets[sheetIndex] property.
- Access the specific range of cells and unmerge them using XlsRange.UnMerge() method.
- Save the result file using Workbook.SaveToFile() method.
- C#
- VB.NET
using Spire.Xls;

namespace UnmergeCells
{
    class Program
    {
        static void Main(string[] args)
        {

            //Create a Workbook instance
            Workbook workbook = new Workbook();
            //Load the Excel file
            workbook.LoadFromFile("MergeCells.xlsx");

            //Get the first worksheet
            Worksheet sheet = workbook.Worksheets[0];
            //Unmerge cells A1-D1
            CellRange range = sheet.Range["A1:D1"];
            range.UnMerge();

            //Save the result file
            workbook.SaveToFile("UnMergeCells.xlsx", ExcelVersion.Version2013);
        }
    }
}
Apply for a Temporary License
If you'd like to remove the evaluation message from the generated documents, or to get rid of the function limitations, please request a 30-day trial license for yourself.
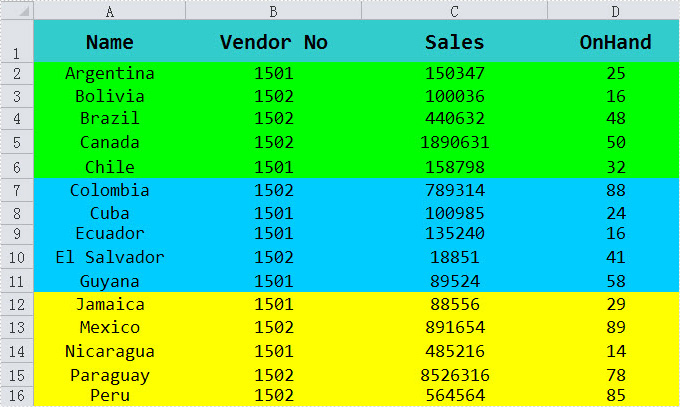
Excel background color is very useful for developers to analyze data information. Setting background color of rows or columns in a similar category makes the data obviously shown. In this section, one line of code will help you easily set your excel background color in a fast way by a .NET Excel component.
Spire.XLS for .NET is an Excel document generating, reading, writing and manipulating component for .NET. It enables you to set excel background color by the class Spire.Xls.Worksheet. Range[].Style.Color. While before setting the background color, you need to use Workbook.LoadFromFile(string fileName, bool preserveMode) method to load your Excel file from system and save the excel file by Workbook.SaveToFile(string fileName) after.
Please Download Spire.XLS for .NET and preview the target excel as picture below:
using System.Drawing;
using Spire.Xls;

namespace background_color
{
    class Program
    {
        static void Main(string[] args)
        {
            Workbook workbook = new Workbook();
            workbook.LoadFromFile(@"..\Backgroundcolor.xls", ExcelVersion.Version97to2003);
            Worksheet worksheet = workbook.Worksheets[0];

            //set the backgroundcolor of Range["A1:D1"]
            worksheet.Range["A1:D1"].Style.Color = Color.LightSeaGreen;

            //set the backgroundcolor of Range["A2:D6"]
            worksheet.Range["A2:D6"].Style.Color = Color.SpringGreen;

            //set the backgroundcolor of Range["A7:D11"]
            worksheet.Range["A7:D11"].Style.Color = Color.DeepSkyBlue;

            //set the backgroundcolor of Range["A12:D16"]
            worksheet.Range["A12:D16"].Style.Color = Color.Yellow;

            //save and launch the project
            workbook.SaveToFile("test.xls", ExcelVersion.Version97to2003);
            System.Diagnostics.Process.Start(workbook.FileName);
        }

    }
}
Imports System.Drawing
Imports Spire.Xls

Namespace background_color

    Class Program

        Private Shared Sub Main(ByVal args() As String)
            Dim workbook As Workbook = New Workbook
            workbook.LoadFromFile("..\Backgroundcolor.xls", ExcelVersion.Version97to2003)
            Dim worksheet As Worksheet = workbook.Worksheets(0)
            'set the backgroundcolor of Range["A1:D1"]
            worksheet.Range("A1:D1").Style.Color = Color.LightSeaGreen
            'set the backgroundcolor of Range["A2:D6"]
            worksheet.Range("A2:D6").Style.Color = Color.SpringGreen
            'set the backgroundcolor of Range["A7:D11"]
            worksheet.Range("A7:D11").Style.Color = Color.DeepSkyBlue
            'set the backgroundcolor of Range["A12:D16"]
            worksheet.Range("A12:D16").Style.Color = Color.Yellow
            'save and launch the project
            workbook.SaveToFile("test.xls", ExcelVersion.Version97to2003)
            System.Diagnostics.Process.Start(workbook.FileName)
        End Sub
    End Class
End Namespace
Spire.XLS allows user to operate Excel document directly such as save to stream, save as web response, copy, lock/unlock worksheet, set up workbook properties, etc. As a professional .NET/Silverlight Excel component, it owns the ability of inserting content into Excel document, formatting cells and converting Excel documents to popular office file formats. Spire.XLS for .NET supports Excel 97-2003, Excel 2007 and Excel 2010.
