Cell borders play a crucial role in enhancing the visual clarity and organization of data in Excel spreadsheets. Adding borders to cells can help draw attention to specific data points, highlight headers, or create clear boundaries between different sections of your worksheet. On the other hand, removing borders can provide a sleek and seamless appearance, especially when you want to eliminate distractions and focus solely on the data itself.
In this comprehensive guide, we will walk you through the process of adding or removing cell borders in Excel by using the Spire.XLS for Python library.
- Add Borders to a Selected Cell or Cell Range in a Worksheet
- Add Borders to the Cell Range Containing Data in a Worksheet
- Add Left, Top, Right, Bottom, Diagonal Borders to a Cell
- Remove Borders of a Cell or Cell Range in a Worksheet
Install Spire.XLS for Python
This scenario requires Spire.XLS for Python and plum-dispatch v1.7.4. They can be easily installed in your Windows through the following pip command.
pip install Spire.XLS
If you are unsure how to install, please refer to this tutorial: How to Install Spire.XLS for Python on Windows
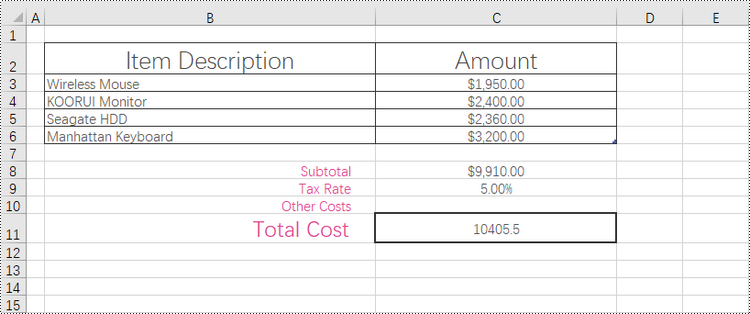
Add Borders to a Selected Cell or Cell Range in a Worksheet in Python
Borders can be applied to individual cells, groups of cells, or even entire ranges to create clear boundaries and make data stand out. By adding borders, you can effectively organize and structure your data, making it easier to analyze and understand.
With Spire.XLS for Python, accessing specific cells or cell ranges is made easy through the Worksheet.Range[name: str] property. Once you have obtained the desired cell or cell range, you can apply an outside border using the CellRange.BorderAround() method. Additionally, you can apply inside borders to a cell range using the CellRange.BorderInside() method.
To apply borders to a cell or cell range, follow the steps below.
- Create a Workbook object.
- Load an Excel document from the specified path.
- Get a specific worksheet from the workbook.
- Get a cell or cell range using Worksheet.Range[name: str] property.
- Apply outside borders to the cell or cell range using CellRange.BorderAround() method.
- Apply inside borders to the cell range using CellRange.BorderInside() method.
- Save the workbook to a new Excel file.
- Python
from spire.xls import *
from spire.xls.common import *

# Create a Workbook object
workbook = Workbook()

# Load an Excel document
workbook.LoadFromFile("C:\\Users\\Administrator\\Desktop\\sample.xlsx")

# Get the first worksheet
worksheet = workbook.Worksheets[0]

# Get a specific cell
cell = worksheet.Range["C11"]

# Apply borders to the cell
cell.BorderAround(LineStyleType.Medium, Color.get_Black())

# Get a cell range
cellRange = worksheet.Range["B2:C6"]

# Apply outside borders to the cell range
cellRange.BorderAround(LineStyleType.Thin, Color.get_Black())

# Apply inside borders to the cell range
cellRange.BorderInside(LineStyleType.Thin, Color.get_Black())

# Save the document
workbook.SaveToFile("Output/AddBordersToCellRange.xlsx", ExcelVersion.Version2016)

# Dispose resources
workbook.Dispose()
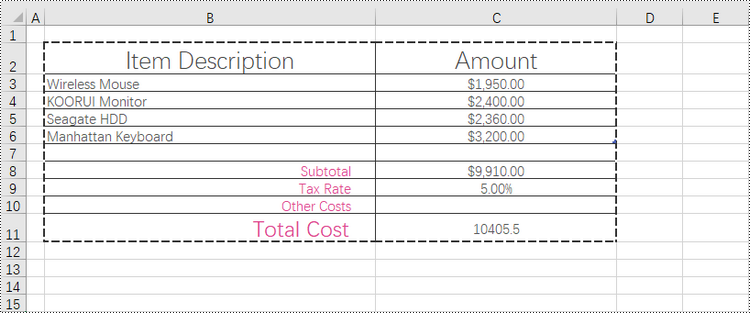
Add Borders to the Cell Range Containing Data in a Worksheet in Python
The range that contains data in a worksheet is commonly referred to as the "allocated range" or "used range". It represents the rectangular area that encompasses all the cells with data, including text, numbers, formulas, and other types of content.
To retrieve the cell range having data, use the Worksheet.AllocatedRange property. Then, you can easily apply borders to this range using the BorderAround() and BorderInside() methods.
The steps to add borders to the cell range containing data are as follows.
- Create a Workbook object.
- Load an Excel document from the specified path.
- Get a specific worksheet from the workbook.
- Get the cell range that contains data using Worksheet.AllocatedRange property.
- Apply outside borders to the cell or cell range using CellRange.BorderAround() method.
- Apply inside borders to the cell range using CellRange.BorderInside() method.
- Save the workbook to a new Excel file.
- Python
from spire.xls import *
from spire.xls.common import *

# Create a Workbook object
workbook = Workbook()

# Load an Excel document
workbook.LoadFromFile("C:\\Users\\Administrator\\Desktop\\sample.xlsx")

# Get the first worksheet
worksheet = workbook.Worksheets[0]

# Get the cell range that contains data
locatedRange = worksheet.AllocatedRange

# Apply outside borders to the cell range
locatedRange .BorderAround(LineStyleType.MediumDashed, Color.get_Black())

# Apply inside borders to the cell range
locatedRange .BorderInside(LineStyleType.Thin, Color.get_Black())

# Save the document
workbook.SaveToFile("Output/AddBordersToLocatedRange.xlsx", ExcelVersion.Version2016)

# Dispose resources
workbook.Dispose()
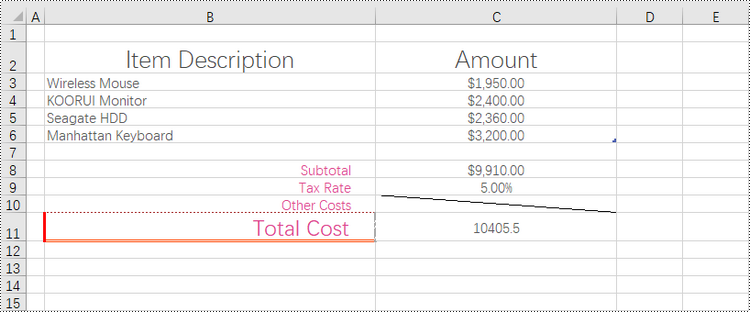
Add Left, Top, Right, Bottom, Diagonal Borders to a Cell in Python
In addition to applying outside and inside borders, you have the option to add left, top, right, bottom, and diagonal borders to individual cells or cell ranges. This feature allows you to go beyond basic border customization and provides additional flexibility to highlight important information, separate sections within your worksheet, or provide a visual structure to your data.
Spire.XLS provides convenient access to specific borders, including the left, right, top, bottom, and diagonal borders, through properties such as CellRange.Borders[BordersLineType.EdgeLeft]. Once you have obtained the desired border, you have the flexibility to customize its appearance by utilizing the IBorder.LineStyle property and the IBorder.Color property.
To add left, top, right, bottom, diagonal borders to a cell, follow the following steps.
- Create a Workbook object.
- Load an Excel document from the specified path.
- Get a specific worksheet from the workbook.
- Get a specific cell using Worksheet.Range property.
- Get the left, top, right, bottom and diagonal borders of the cell using the properties such as CellRange.Borders[BordersLineType.EdgeLeft].
- Set the line style of the border using IBorder.LineStyle property
- Set the color of the border using IBorder.Color property.
- Save the workbook to a new Excel file.
- Python
from spire.xls import *
from spire.xls.common import *

# Create a Workbook object
workbook = Workbook()

# Load an Excel document
workbook.LoadFromFile("C:\\Users\\Administrator\\Desktop\\sample.xlsx")

# Get the first worksheet
worksheet = workbook.Worksheets[0]

# Get a cell
cell = worksheet.Range["B11"]

# Get the left, top, right, bottom border of the cell
leftBorder = cell.Borders[BordersLineType.EdgeLeft]
topBorder = cell.Borders[BordersLineType.EdgeTop]
rightBorder = cell.Borders[BordersLineType.EdgeRight]
bottomBorder = cell.Borders[BordersLineType.EdgeBottom]

# Set the border type respectively
leftBorder.LineStyle = LineStyleType.Thick
topBorder.LineStyle = LineStyleType.Dotted
rightBorder.LineStyle = LineStyleType.SlantedDashDot
bottomBorder.LineStyle = LineStyleType.Double

# Set the border color respectively
leftBorder.Color = Color.get_Red()
topBorder.Color = Color.get_Brown()
rightBorder.Color = Color.get_DarkGray()
bottomBorder.Color = Color.get_OrangeRed()

# Get a specific cell
cell = worksheet.Range["C10"]

# Get the diagonal border of the cell
diagonalBorder = cell.Borders[BordersLineType.DiagonalDown]

# Set the border style
diagonalBorder.LineStyle = LineStyleType.Thin

# Save the document
workbook.SaveToFile("Output/BorderOfEdge.xlsx", ExcelVersion.Version2016)

# Dispose resources
workbook.Dispose()
Remove Borders of a Cell or Cell Range in a Worksheet in Python
Borders can be removed from individual cells, groups of cells, or even entire ranges, allowing you to reduce visual noise and clutter, making your data easier to interpret and analyze. Additionally, you can choose to remove borders from specific sides of a cell, such as the left, top, right, or bottom, which can alter the visual appearance and enhance the overall presentation.
To eliminate borders surrounding or within a cell or cell range, you can easily achieve this by setting the CellRange.Borders.LineStyle property to LineStyleType.none. Similarly, if you want to remove a border on a specific side, such as the left side, you can accomplish this by setting the CellRange.Borders[BordersLineType.EdgeLeft].LineStyle property to LineStyleType.none.
The steps to remove borders of a cell or cell range as follows.
- Create a Workbook object.
- Load an Excel document from the specified path.
- Get a specific worksheet from the workbook.
- Get a specific cell or cell range using Worksheet.Range property.
- Remove all borders of the cell or cell range by setting CellRange.Borders.LineStyle property to LineStyleType.none.
- Save the workbook to a new Excel file.
- Python
from spire.xls import *
from spire.xls.common import *

# Create a Workbook object
workbook = Workbook()

# Load an Excel document
workbook.LoadFromFile("C:\\Users\\Administrator\\Desktop\\BorderExample.xlsx")

# Get the first worksheet
worksheet = workbook.Worksheets[0]

# Get a cell
cell = worksheet.Range["C11"]

# Remove borders by setting line style to none
cell.Borders.LineStyle = LineStyleType.none

# Remove border on a specific side
# cell.Borders[BordersLineType.EdgeLeft].LineStyle = LineStyleType.none

# Get a cell range
cellRange = worksheet.Range["B2:C6"]

# Remove borders by setting line style to none
cellRange.Borders.LineStyle = LineStyleType.none

# Save the document
workbook.SaveToFile("Output/RemoveBorders.xlsx", ExcelVersion.Version2016)

# Dispose resources
workbook.Dispose()
Apply for a Temporary License
If you'd like to remove the evaluation message from the generated documents, or to get rid of the function limitations, please request a 30-day trial license for yourself.