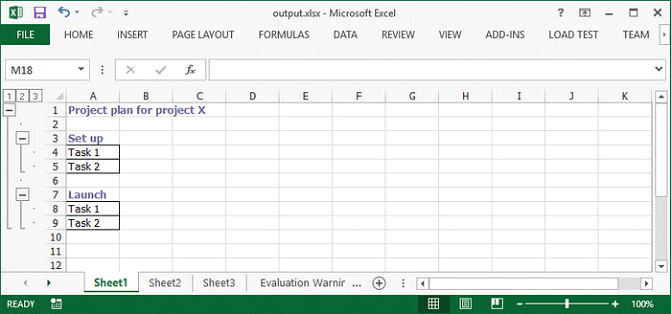
Nested group is a group that contains multiple inner, nested groups. This article demonstrates how to create groups and how to outline the outer and inner groups using Spire.XLS with C# and VB.NET.
Step 1: Create a Workbook instance and get the first worksheet.
Workbook workbook = new Workbook();
Worksheet sheet = workbook.Worksheets[0];
Step 2: Insert sample data to cells.
sheet.Range["A1"].Value = "Project plan for project X";
sheet.Range["A3"].Value = "Set up";
sheet.Range["A4"].Value = "Task 1";
sheet.Range["A5"].Value = "Task 2";
sheet.Range["A7"].Value = "Launch";
sheet.Range["A8"].Value = "Task 1";
sheet.Range["A9"].Value = "Task 2";
Step 3: Set the IsSummaryRowBelow property as false, which indicates the summary rows appear above detail rows.
sheet.PageSetup.IsSummaryRowBelow = false;
Step 4: Group the rows that you want to group.
sheet.GroupByRows(2, 9, false);
sheet.GroupByRows(4, 5, false);
sheet.GroupByRows(8, 9, false);
Step 5: Save the file.
workbook.SaveToFile("output.xlsx", ExcelVersion.Version2013);
Output:

Full Code:
[C#]
using Spire.Xls;
using System.Drawing;
namespace CreateNestedGroup
{
    class Program
    {
        static void Main(string[] args)
        {
            Workbook workbook = new Workbook();
            Worksheet sheet = workbook.Worksheets[0];

            CellStyle style = workbook.Styles.Add("style");
            style.Font.Color = Color.CadetBlue;
            style.Font.IsBold = true;

            sheet.PageSetup.IsSummaryRowBelow = false;
            sheet.Range["A1"].Value = "Project plan for project X";
            sheet.Range["A1"].CellStyleName = style.Name;

            sheet.Range["A3"].Value = "Set up";
            sheet.Range["A3"].CellStyleName = style.Name;
            sheet.Range["A4"].Value = "Task 1";
            sheet.Range["A5"].Value = "Task 2";
            sheet.Range["A4:A5"].BorderAround(LineStyleType.Thin);
            sheet.Range["A4:A5"].BorderInside(LineStyleType.Thin);

            sheet.Range["A7"].Value = "Launch";
            sheet.Range["A7"].CellStyleName = style.Name;
            sheet.Range["A8"].Value = "Task 1";
            sheet.Range["A9"].Value = "Task 2";
            sheet.Range["A8:A9"].BorderAround(LineStyleType.Thin);
            sheet.Range["A8:A9"].BorderInside(LineStyleType.Thin);

            sheet.GroupByRows(2, 9, false);
            sheet.GroupByRows(4, 5, false);
            sheet.GroupByRows(8, 9, false);
            workbook.SaveToFile("output.xlsx", ExcelVersion.Version2013);
        }
    }
}
[VB.NET]
Imports Spire.Xls
Imports System.Drawing
Namespace CreateNestedGroup
	Class Program
		Private Shared Sub Main(args As String())
			Dim workbook As New Workbook()
			Dim sheet As Worksheet = workbook.Worksheets(0)

			Dim style As CellStyle = workbook.Styles.Add("style")
			style.Font.Color = Color.CadetBlue
			style.Font.IsBold = True

			sheet.PageSetup.IsSummaryRowBelow = False
			sheet.Range("A1").Value = "Project plan for project X"
			sheet.Range("A1").CellStyleName = style.Name

			sheet.Range("A3").Value = "Set up"
			sheet.Range("A3").CellStyleName = style.Name
			sheet.Range("A4").Value = "Task 1"
			sheet.Range("A5").Value = "Task 2"
			sheet.Range("A4:A5").BorderAround(LineStyleType.Thin)
			sheet.Range("A4:A5").BorderInside(LineStyleType.Thin)

			sheet.Range("A7").Value = "Launch"
			sheet.Range("A7").CellStyleName = style.Name
			sheet.Range("A8").Value = "Task 1"
			sheet.Range("A9").Value = "Task 2"
			sheet.Range("A8:A9").BorderAround(LineStyleType.Thin)
			sheet.Range("A8:A9").BorderInside(LineStyleType.Thin)

			sheet.GroupByRows(2, 9, False)
			sheet.GroupByRows(4, 5, False)
			sheet.GroupByRows(8, 9, False)
			workbook.SaveToFile("output.xlsx", ExcelVersion.Version2013)
		End Sub
	End Class
End Namespace


